We are very pleased to be hosting this Month’s Mixology Monday, the world’s most excellent online cocktail party, (the Roundup is here). Now that the holidays are behind us, we get to deal with the rest of winter… that magnificent season of grey skies, blustery winds, freezing sleet and blowing snow. January is Mixology Monday CV and we’re definitely talking cocktails.
Winter usually evokes scenes of roaring fires with glasses or mugs filled with warming liquid fortifying us against the cold and damp. Winter provides the shared universal experience that spans language, geography and the centuries – that moment just before you step out into the cold; to walk to the bus stop, hit the ski slope, shovel the snow or feed the livestock. So what adult beverages can best prepare the body and steel the will for that moment when we go forth into Winter?
Thus, the theme for Mixology Monday CV is “Brace Yourself.” The challenge is to create a cocktail that will buttress oneself for Winter’s outdoor adventures.
Here’s how to play:
Find or create a cocktail that gives you the resolve to head out into the cold.
Make the drink and then post the recipe, a photo, and your thoughts about the drink on your blog, tumblr, or website or on the eGullet Spirits and Cocktails forum.
Be sure to include the Mixology Monday logo in your post, and links back to Mixology Monday and Doc Elliott’s Mixology. Once the round-up is posted, a link to that summary post would be appreciated.
Submissions are due by Monday, January 25th. Notify me of your submission by commenting with a link below, or send me a link on Twitter @docscocktails with the hashtag #MxMo.
So this leaves us 2 weeks to concoct some awesome examples of liquid courage! Once again, the submissions are due midnight of January 25th. Midnight can be whatever time zone you’re in and I will accept late entries.
Thanks again to Frederic Yarm of the CocktailVirgin blog for allowing us to host this month and for keeping Mixology Mondays entertaining and inspiring, (and for coming up with the cool meme).
MxMo CIV
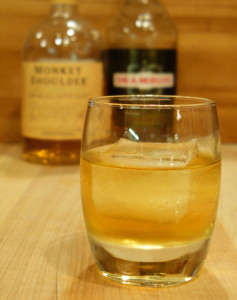
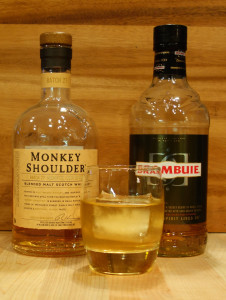
The theme for this month’s Mixology Monday, brought to us this month by Dagreb of the Nihil Utopia blog, is Forgiving Cocktails, as in a “little too much of this and a touch to little of that.” The challenge is to submit a cocktail that is tolerant of a bit of sloppiness in its preparation. This lack of precision is, of course, exactly the opposite of what we generally do for this online cocktail party. While things like Rum and Coke or Jack and Coke came to mind, I decided on the Rusty Nail. In the past, I firmly believed that Scotch should be mixed only with ice or a few drops of water, if that. This belief also included the doctrine that real Scotch wasn’t blended! Well, I finally saw the light and discovered that good Scotch can make a great cocktail and that well made blends can make a great Scotch.
Mixology Monday
Sometime back, I posted the Smokin’ Nail. This is a tea smoked combination of Single Malt Scotch and Drambuie. I have seen Rusty Nail recipes use anywhere from 4:”1 Scotch:Drambuie to 1:1. For the Smokin’ Nail, I used 4:1. Since the exact ratio is variable, you should get a decent cocktail even from an inexperienced bartender. In addition, you can add bitters and/or a twist of lemon. Dave Stolte muddles a lemon peel and bitters in an old fashioned glass, and then builds the drink adding ice, Scotch and Drambuie. At this year’s Tales of the Cocktail, the folks from Monkey Shoulder were serving up a delicious Rusty Nail. This is my version of that cocktail:
1 1/2 oz. Monkey Shoulder Blended Scotch
3/4 oz. Drambuie
1 dash Dale DeGroff’s Pimento Bitters – optional
1 lemon peel – optional
Chill an Old Fashioned Glass with ice and water
Combine the Scotch, Drambuie and bitters (if using) in a mixing glass with ice and stir to chill
Strain into chilled glass over a large fresh ice cube
Express the lemon peel over the cocktail and discard the peel.
I like adding the bitters. They decrease the sweetness of the Drambuie without detracting from its flavors. The lemon peel adds further complexity.
So, a fresh glass, a chunk of ice, some Scotch and a little Drambuie – you’re good to go!!
Cheers!
Hemingway Deconstructed
Mixology Monday
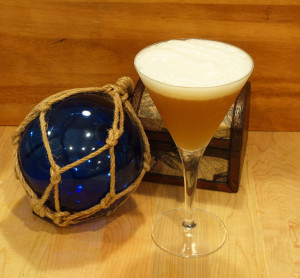
This Month’s Mixology Monday is upon us and the theme is “Standoffish.” Brought to us by the folks at Booze Nerds, the idea is to add an ingredient to a cocktail that is not included with the main ingredients and is not a garnish. At the same time, this ingredient needs to add something to the final drink. Well, we love foams and foams can fill these requirements! We have two cocktails to offer, but before I get to them, I want to ramble on about foams for a moment!
I generally limit the foaming ingredient, ( the surfactant), to egg whites. Gel sheets produce a prettier and more stable foam, but they take a little more effort than I usually wish to invest. Egg whites are quick, stable enough and reliable. I also generally use pasteurized egg whites for our foams. I think that they are better for this application than are fresh egg whites.
The foams I make are from one of two ratios:
2 egg whites: 6 oz. of liquid
3 egg whites: 5 oz. of liquid
The 3:5 ratio produces a creamier and, therefore, thinner foam. While the 2:6 ratio creates a light and fluffy foam. For these cocktails, I used the 2:6 ratio for the daiquiri and the 3:5 for the shooters.
Now, on with the drinks! We have chosen a seasonally appropriate shooter that can either be a cocktail or an appetizer and is easily adjusted to accommodate the non-drinkers in the crowd. The other probably reflects my wish to either hold onto summer or to head for the Islands!
The Hemingway Deconstructed
This cocktail is our Z Daiquiri, which is along the lines of a Hemingway, but without the grapefruit juice. So we simply incorporate the grapefruit juice in the foam. The foam is tart and a touch bitter. It combines very nicely with the not too sweet daiquiri. While on the the topic of sweetness, you may want to adjust the amount of simple syrup based on the tartness of your lime juice.
Ingredients:
2 oz. good aged rum
¼ oz. Luxardo Maraschino Liqueur
2 oz. fresh lime juice
1 oz. simple syrup
Hemingway foam – see below
Directions:
Chill a martini glass with ice and water.
While the glass chills, combine all of the ingredients, except the foam, in a shaker.
Shake with ice until shaker is fully frosted: 10 – 15 seconds
Strain into the chilled martini glass.
Carefully float the foam from your iSi whipper and serve immediately
Hemingway Foam
2 egg whites (3 oz. pasteurized egg whites) lightly beaten
2 oz. Luxardo Maraschino Liqueur
4 oz. Fresh grapefruit juice – double strained
2 Dashes Bitter Truth Grapefruit Bitters
Add all ingredients to an iSi Whipper
Seal the whipper and shake to further break up the egg whites
Double charge the Whipper with N2O, shaking after each charge
Refrigerate for 2 hours before use. Will keep refrigerated for a few days.
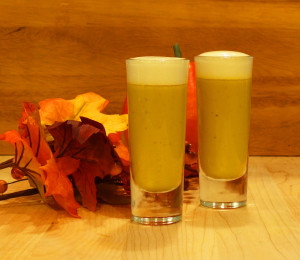
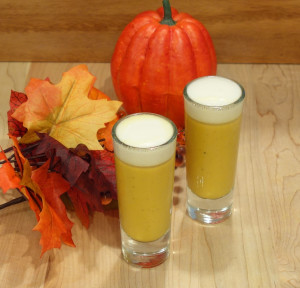
Pumpkin Bisque Shooters
First, a big “Thank You” to Booze Nerds because without this MxMo, I might not have thought to add the Applejack foam to these! I love pumpkin and I’ve always been a fan of pumpkin bisque. I like mine to be savory. Save the sweet for the pie! Since I have a more than passing infatuation with rum, I simply looked to combine two of my favorite flavors. I tried this warm, with bourbon and with dark rum. Not great in any combination. Cold bisque and gold rum were the perfect match. The bitter sweet flavor of the apple brandy foam is perfect with the savory, slightly spicy pumpkin bisque.
For 2 Shooters:
2 oz. Cold Pumpkin Bisque – see below
1/2 oz. Gold rum such as Cruzan or Mount Gay
1 dash Simple syrup
1 Dash Angostura Bitters
Apple Brandy Foam – see below
Combine pumpkin bisque,rum simple syrup and bitters in a mixing glass without ice and stir to combine.
Divide between 2 tall shooters
Gently float the Apple Brandy Foam on the shooters
Serve immediately
Apple Brandy Foam
3 egg whites (4 1/2 oz pasteurized egg whites)
3 oz. Applejack Brandy
2 oz. Fresh Orange juice – double strained
2 Dashes Bar Keep Apple Bitters
Add all ingredients to an iSi Whipper
Seal the whipper and shake to further break up the egg whites
Double charge the Whipper with N2O, shaking after each charge
Refrigerate for 2 hours before use. Will keep refrigerated for a few days.
Pumpkin Bisque
1 tsp Cayenne
2 Cups Diced Onion
2 cloves Chopped Garlic
1 1/2 Tbls. Butter
1 – 15 oz. Can Pumpkin Puree
4 Cups Chicken Stock
1/4 tsp. Ground Allspice
1/2 tsp Fresh ground black pepper
1/4 tsp. Salt to Taste
1/4 Cup Dry Sherry
1 Cup Heavy Cream
Saute the onions in the butter until translucent – about 3 minutes. Add the garlic and cook 30 sec.
Add the rest of the ingredients except the cream and simmer for 30 min
Place the mixture in a blender and puree until smooth.
Return the puree to the pot, add the cream and continue to cook until heated through.
Serve immediately or cool for the above shooters.
Cheers!
Mixology Monday CI – Orange Juice
This month’s theme for Mixology Monday is Orange Juice, brought to us from the host of MxMo 101, DJ Hawaiian Shirt of the Spirited Remix blog. And, not just “Orange,” but Orange Juice. I think this month’s challenge is great because we love OJ! The first drink I thought of is the Potted Parrot, and second is a cocktail I created a few years ago that, in addition to OJ, has Wild Turkey 101. Somehow that number 101 seems appropriate as well! I wanted to contribute something original but I’ll get back to that in a minute. The first drink is:
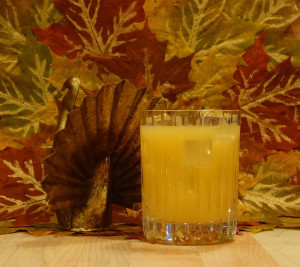
Wild Turkey in Heat
This cocktail is a bourbon and orange sour with the almond sweetness of the orgeat and the kick of habanero. The name originated during a family ski trip to Steamboat Springs a number of years ago. We always ate dinner at the Tugboat Saloon on our first night and, so, cold and tired, I spotted a bottle of Wild Turkey behind the bar. I asked the waitress if they had Wild Turkey 101. She replied, “Yes.” To which I said, “I’ll have that neat.” She then repeated my order, “A Wild Turkey neat.” Now, from the other end of the table, with great incredulity, our teenage daughter asked: “What’s a Wild Turkey in Heat?”
a dash of 2:1 simple syrup or ¼ oz. regular simple syrup
2 dashes Bittermans Habanero Shrub
Chill a Double Old Fashioned glass with ice and water
Add all ingredients to shaker and shake with ice
Add unstrained to chilled Double Old Fashioned
L’Orange Indulgence
This is our cocktail especially concocted for MxMo CI. I don’t often create desert drinks but I began by imagining the flavors of a chocolate covered, orange rum ball to be savored accompanied by a cup of coffee. Here is the formula for this sweet orange indulgence:
Ingredients
2 oz. Premium white rum
4 oz. Fresh orange juice
1/2 oz. Creme de Cacao – white
1/2 oz. Licor 43
Coffee foam – see below (This drink does require a whipped cream maker. If you don’t have one, you really should get one, for this drink and others!)
Directions
Chill a fancy cocktail glass with ice and water
Combine rum, OJ, Creme de Cacao and Liquor 43 in a shaker with ice and shake to chill
Strain into chilled cocktail glass
Float foam over the drink and serve
For the Coffee Foam
Ingredients
3 egg whites, 9 Tbl or 4 ½ oz. pasteurized egg whites (see note)
3 oz. Tia Maria
2 oz. orange juice double strained
1 dash Regans Orange Bitters
Directions
Lightly whip egg whites – be fairly aggressive if using fresh
Add all ingredients to whipped cream charger
Secure top and shake a few times to further break up the egg whites and combine ingredients.
Double charge with N2O, shaking 4-5 times between charges. Over shaking can cause ingredients to clump and clog charger.
Chill for at least 1 hour before use.
Keeps a few days refrigerated.
Note: Pasteurized egg whites work best – the plain variety, not the yellow dyed brand. The fresh egg whites will not keep as long and they can make a foam that clumps. If you use fresh egg whites, beat them pretty well to break up the protein strands.
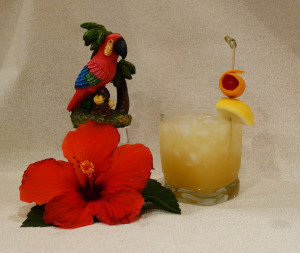
And last but not least, the Potted Parrot. I like this Tiki drink and we usually include it as a choice for our guests when we break out the little umbrellas!
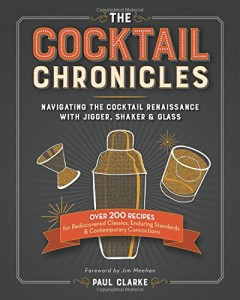
I’m a relative new comer to Mixology Monday, having contributed for only about a year. So my twelve entries are a modest offering when one considers that this monthly online cocktail party is now 100 months old! This month’s theme comes from MxMo’s dedicated leader Frederic Yarm at the cocktail virgin slut. It is “Cocktail Chronicles” and is a tribute to Mixology Monday’s founder Paul Clarke. Paul has written at the Cocktail Chronicles blog since 2005, and has now authored a book The Cocktail Chronicles: Navigating the Cocktail Renaissance with Jigger, Shaker & Glass. The book is an insider’s look at the cocktail “revolution” of the past decade. While it is not really a history, it does give insight into where we were and where we are today. He also highlights the classic yet simple cocktails that form the backbone of what we call “mixology.”
The theme, “Cocktail Chronicles” for this month’s Mixology Monday is, as described in the announcement post, “what is timeless (or potentially timeless) and elegant in its simplicity.” Wonderful yet uncomplicated. I have interpreted this to mean, “highlight a cocktail that is an essential part of the current cocktail renaissance.”
In selecting our contribution for this month, I have focused on “timeless,” “simple” and “malleability,” (a cocktail that can easily be made into something else). In our focus on home entertainment, these three criteria: elegant, simple and easily modified are huge. Cocktails that have these qualities enable the host to entertain with ease.
I think that a cocktail that has been around for 200 years meets the “timeless” threshold, and if it has three ingredients, it qualifies as “simple.” Now if that cocktail can be, and has been, easily turned into a myriad of famous drinks, it’s a winner. So I have selected the Sour: spirit, juice and sweetener. The Sour has been around since at least the early 1800’s, (check the sidebar for a brief history of the Sour), and it is the forbear of numerous cocktails. From the humble Whiskey Sour has come Daiquiris, Margaritas, the Sidecar, The Aviation, the Pisco Sour, Ward Eight, the Cosmopolitan and many more.
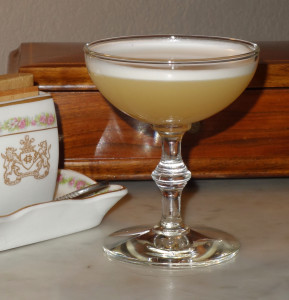
One of my favorite Whiskey Sours is our Belle Meade Sour. It does not follow the usual Sour Ratio of 2:1:1, (Spirit:Sour:Sweet), but I like my whiskey sours 1:1 bourbon and lemon sour. For the lemon sour, I prefer 2:1 lemon to simple syrup. This makes the ratio more like 2:1:2/3 or so. I also like the mouth feel of egg white. So here is our recipe:
1 1/2 oz. Belle Meade Bourbon
1 oz. Fresh lemon juice
1/2 oz. Simple syrup
1 large egg white (can use 3 Tbl. pasteurized egg whites but it will not be the same)
Add all ingredients, in order to a shaker and shake for 30 sec without ice to emulsify the egg white.
Add 3 regular sized ice cubes plus one large cube (1 1/2 – 2 inches)* to the shaker and shake to chill 10 – 15 sec.
Double strain into a chilled coup and serve
* using a large ice cube creates a silky finish that complements the egg white. The effect lasts for only a minute or two, so serve it quickly. You can omit this and use regular ice but you should get a large ice cube tray!
Cheers!
MxMo XCIX – Ice Baby!
MxMo XCIX – Ice Baby!
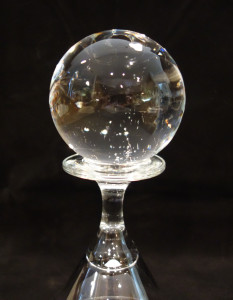
I though I’d take this opportunity to discuss my favorite toy, er, tool. The ice sphere maker.
Making Clear Ice at Home
Mixology Monday
Bottom line, a lot of trouble for little reward. You can easily make clear ice in small quantities. But for entertaining, it’s not practical. I know that in San Antonio, we can purchase large, clear ice cubes for as little as 35₵ each. Nevertheless, if you want something for a small, intimate occasion, here’s a fairly simple method.
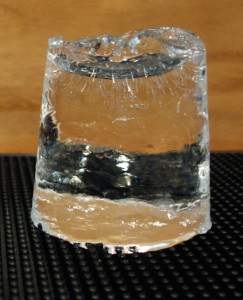
Other than a few bubbles in the bottom, this is a clear ice sphere.
First, let’s look at what makes ice opaque. In no particular order:
Impurities – dirt, etc.
Dissolved salts and other minerals
Bubbles
Compression fractures
To avoid the first two, use filtered water. We use tap water run through a reverse osmosis filter. The last two are harder. To control bubble formation and fractures, you need to control the speed, direction and time of freezing.
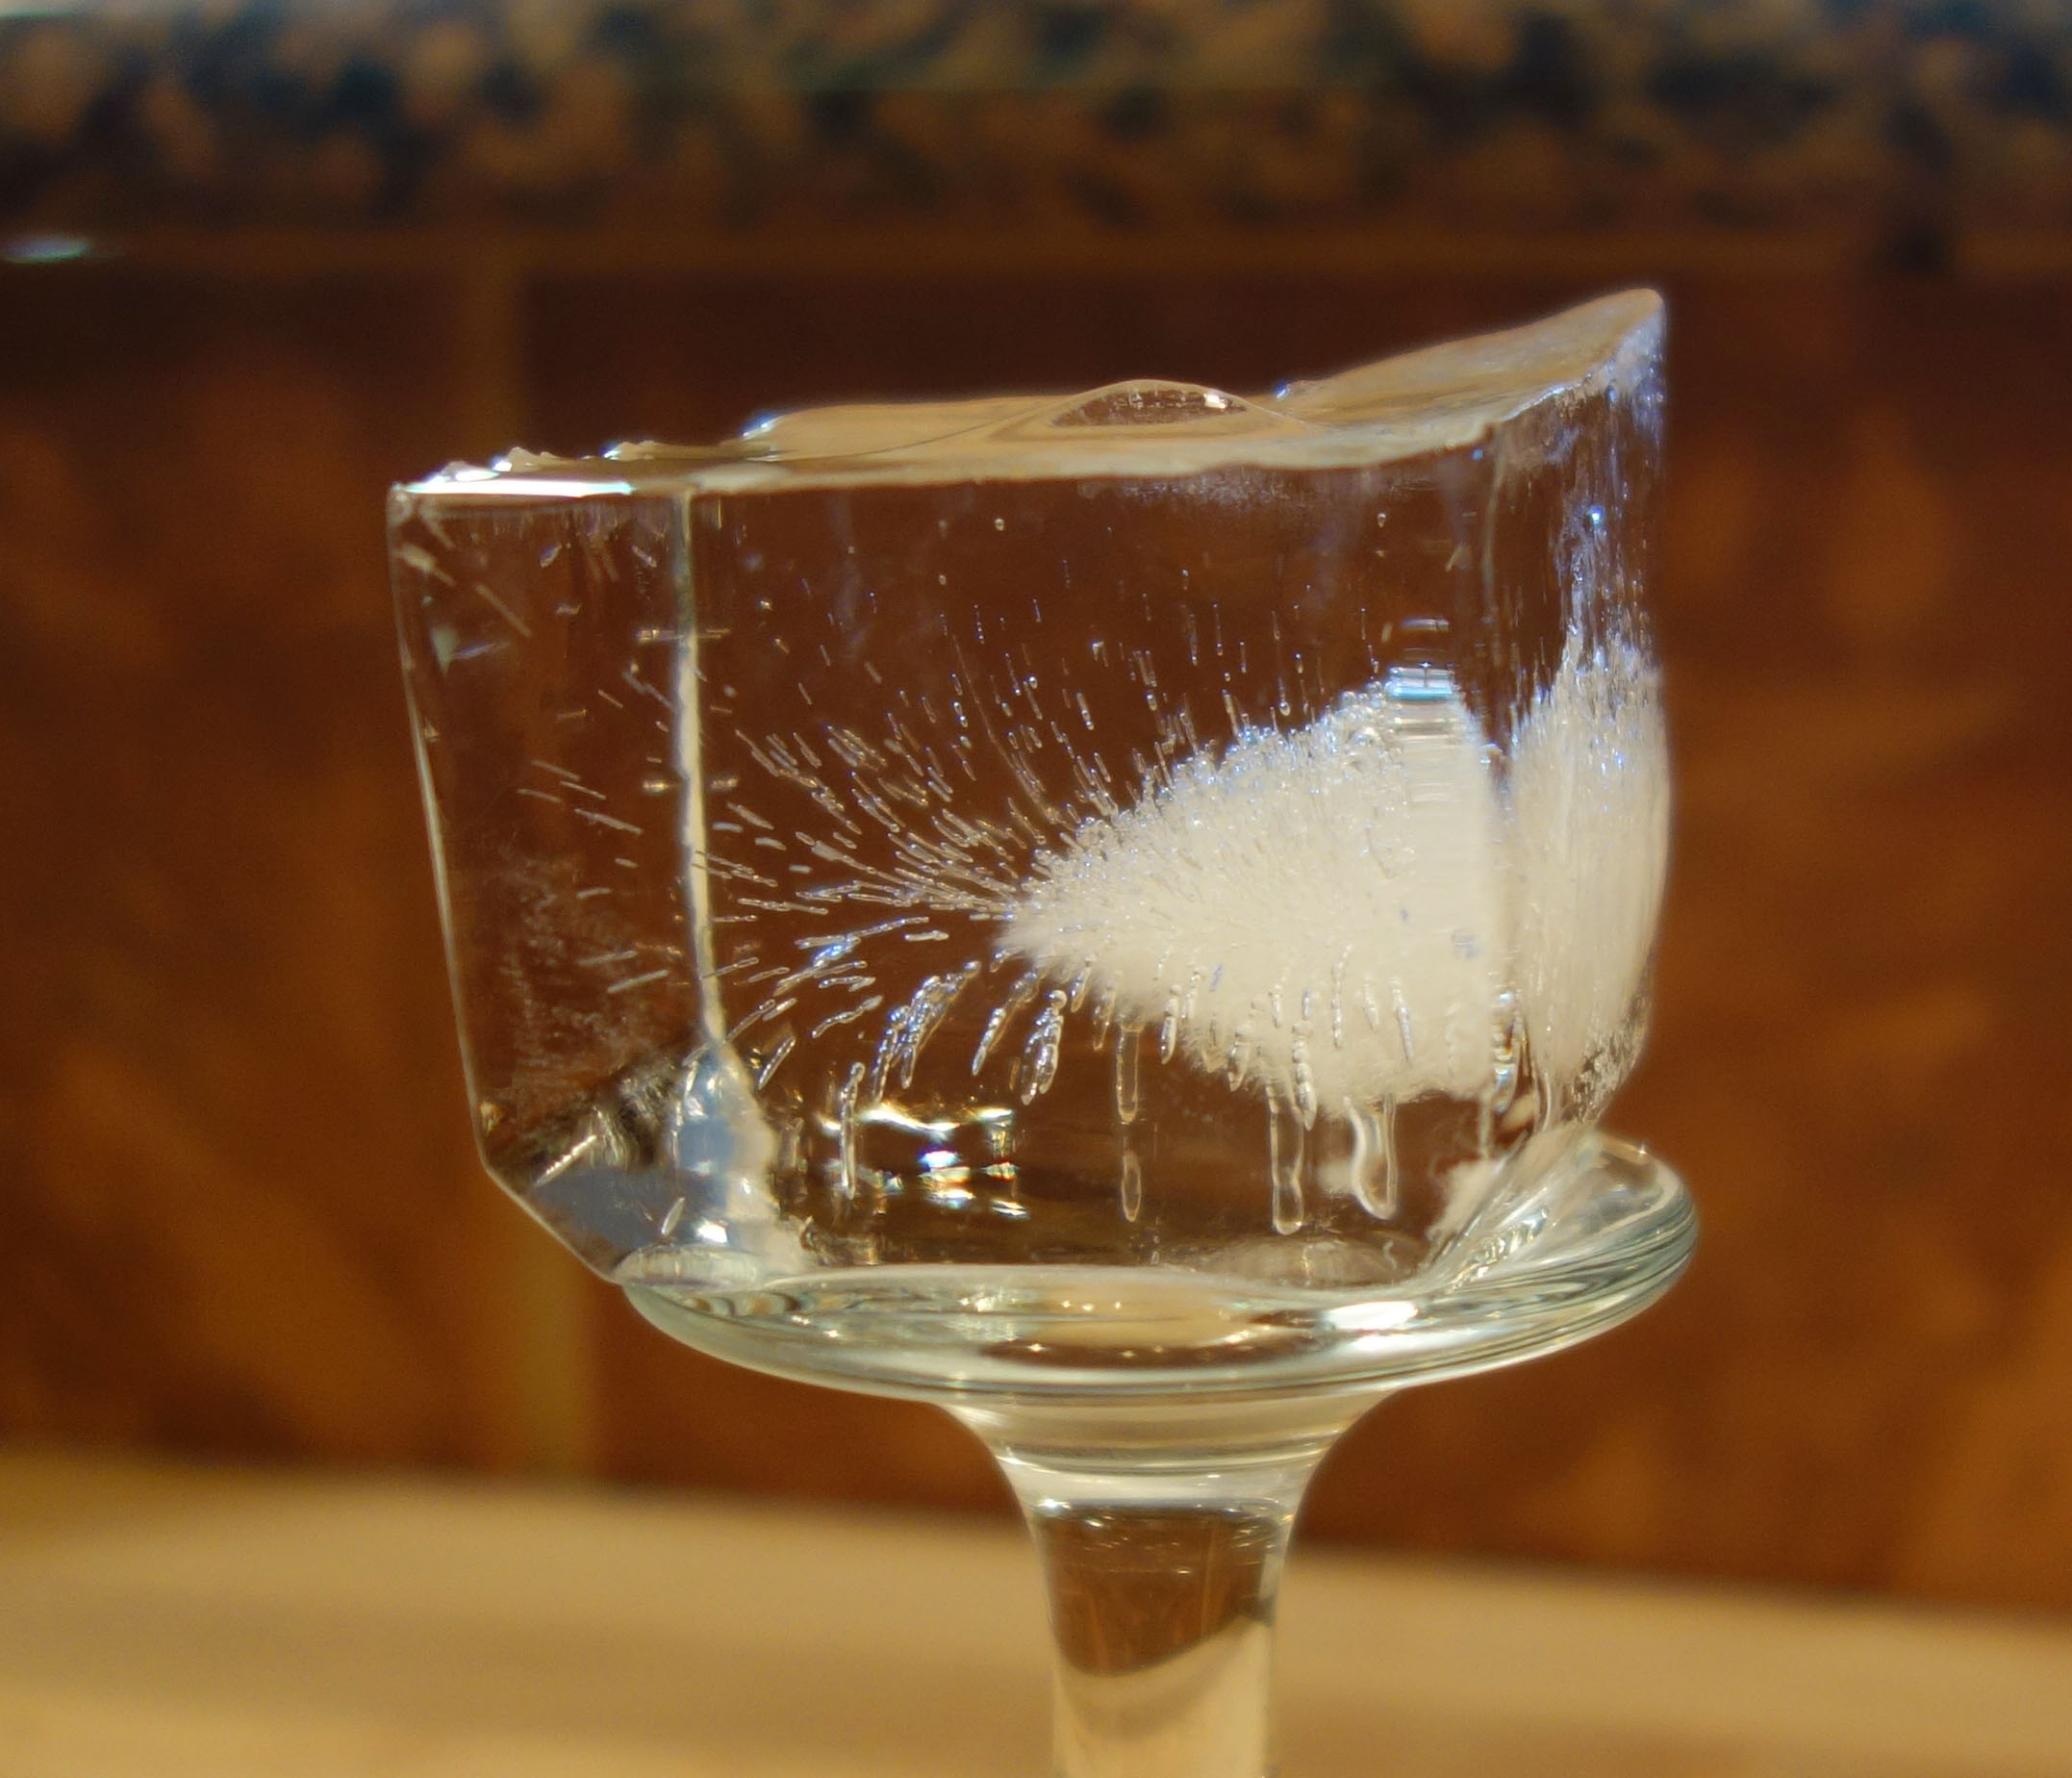
This cube was frozen in the center of a 6 cube tray. It froze from the side (left), top and bottom. You can see that the fractures and bubbles formed where the ice began to meet.
Bubbles form because air is forced out of solution when the water forms ice crystals. As the water freezes, air will come out of solution and become trapped in the ice. The more slowly the water is forming ice crystals, the less likely air will become trapped in the ice. So for bubbles, speed of freezing is the key. As long as there is free water next to the freezing water, the air will move into the free water and away from the ice crystals.
Compression fractures are caused by ice expanding as it freezes. If the water is freezing from one direction, it will remain clear. When the freezing ice meets the bottom of the container, or ice freezing from another direction, it will fracture.
So to make clear ice:
Use filtered water – removes impurities and dissolved minerals
Freeze it from one direction – prevents fracturing
Avoid freezing it quickly – reduces bubbles
Stop it before it freezes to the bottom of the container – reduces bubbles and fractures
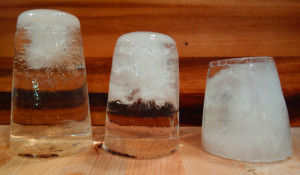
These 3 pieces of ice are sitting top down. All used filtered water. Left: there was a small amount of unfrozen water in the bottom. Fractures and bubbles had started to form. There is plenty of usable clear ice in this piece. Center: the ice has frozen to the bottom. Fractures take up half of the ice. Right: this piece froze from all directions and is heavily fractured.
To freeze from one direction, put the water in an insulated container without a lid into your freezer. The closer the temperature of your freezer is to 32⁰F (0⁰C), the slower your ice will freeze. And the faster your food will spoil. Since we also like to eat, and I don’t feel like having a dedicated freezer to make clear ice, I just pressed on at -6⁰F.
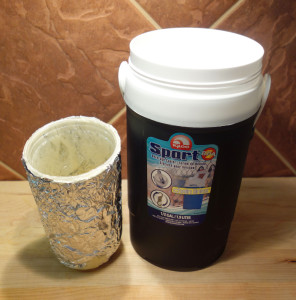
The 1/2 Gal. Cooler and the Cup/Foam/Foil assembly that fits inside
Here is how I solved the insulated container. On the internet, you can find instructions for using spray foam insulation on a cup to make a cup sized piece of clear ice. The problem I have with this is that the foam insulation is not food safe and gives off noxious fumes. So, I limited its use. Instead, I purchased an Igloo ½ Gal. cooler with a screw on lid and some Hefty disposable clear 24 oz. cups. The disposable cup did not quite fit snugly into the bottom of the cooler. This meant that cold air would surround the cup allowing the ice to freeze from multiple directions.
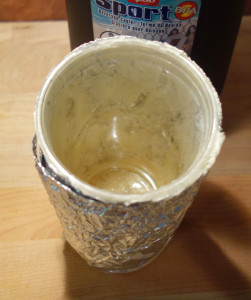
Here you can see through the plastic that the foam is now near the top of the cup.
To prevent this, I lined the bottom of the cooler with aluminum foil, (plastic wrap would be better, but I couldn’t get it to stay down in the bottom). I then put about 3 inches of spray foam insulation into the bottom of the foil lined cooler and shoved 1 Hefty cup down into the foam. Looking through the clear plastic, I could see gaps in the foam near the top of the cup. I carefully removed the foil, foam and cup and gently squirted additional foam between the foil and the plastic. I then put it all back into the cooler. This was allowed to dry for 24 hours. I again pulled out the foil, cup and insulation and trimmed the excess foil and insulation from the top of the cup. The plastic cup now fit snugly into the cooler and my contraption was ready for use.
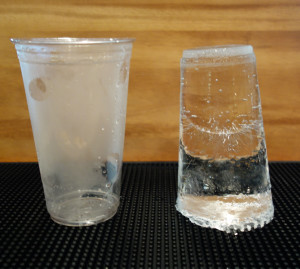
A clear ice plug next to its Hefty cup. It is sitting top down. You can see the freeze line in the center. The bottom and lower sides of the cup had begun to freeze.
Since I refuse to raise the temperature of our freezer, I found that the ice still froze to the bottom of the container too quickly. It was not frozen enough overnight, but was frozen to the bottom before I got home from work. My solution was to first pour very hot water into the cooler and let it sit for 5 minutes. I then drained and dried the cooler and pushed my cup/foil/insulation assembly into the bottom. Next, a single clean Hefty cup was filled with filtered water and set down into the cup/foil/insulation assembly in the bottom of the warm cooler.
To remove the partially frozen bottom, hold the ice with a towel and tap it with a heavy knife.
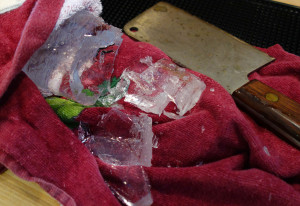
This set up froze the water nearly to the bottom in 22 hours. I broke the bottom of the ice to remove a small amount of water, and then saved the ice in the freezer in a plastic bag. This ice “plug” can be used to make an ice sphere or a large ice cube. Of course, as you can see in the above video, the ice plug can shatter even if you allow it to temper before shaping.
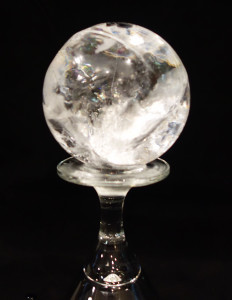
Clear ice plug ready to shape. Always allow the ice to ‘temper’ – let the surface warm to room temperature. The ice will then appear clear rather than frosty. Otherwise, it is more likely to fracture when you shape it.
Clear ice sphere that shattered in the ice sphere maker, even though it was tempered. These fracture lines are on the surface and disappear quickly in the drink.
Cheers!
Hometown Hooch MxMo XCVII
Mixology Monday
It’s time again for the world’s best online cocktail party. The theme for this month’s Mixology Monday is “Hometown Hooch,” as set forth by Stuart Putney at Putney Farms.
You can read more at the announcement post here, but the idea is to use locally distilled spirits in a cocktail. I have chosen Rebecca Creek Distillery for three reasons:
We use their Enchanted Rock Vodka as one of our go to’s
We have a great Old Fashioned using their Texas Whiskey
It’s the only Texas Hill Country distillery that I’ve heard mentioned in a Country song!
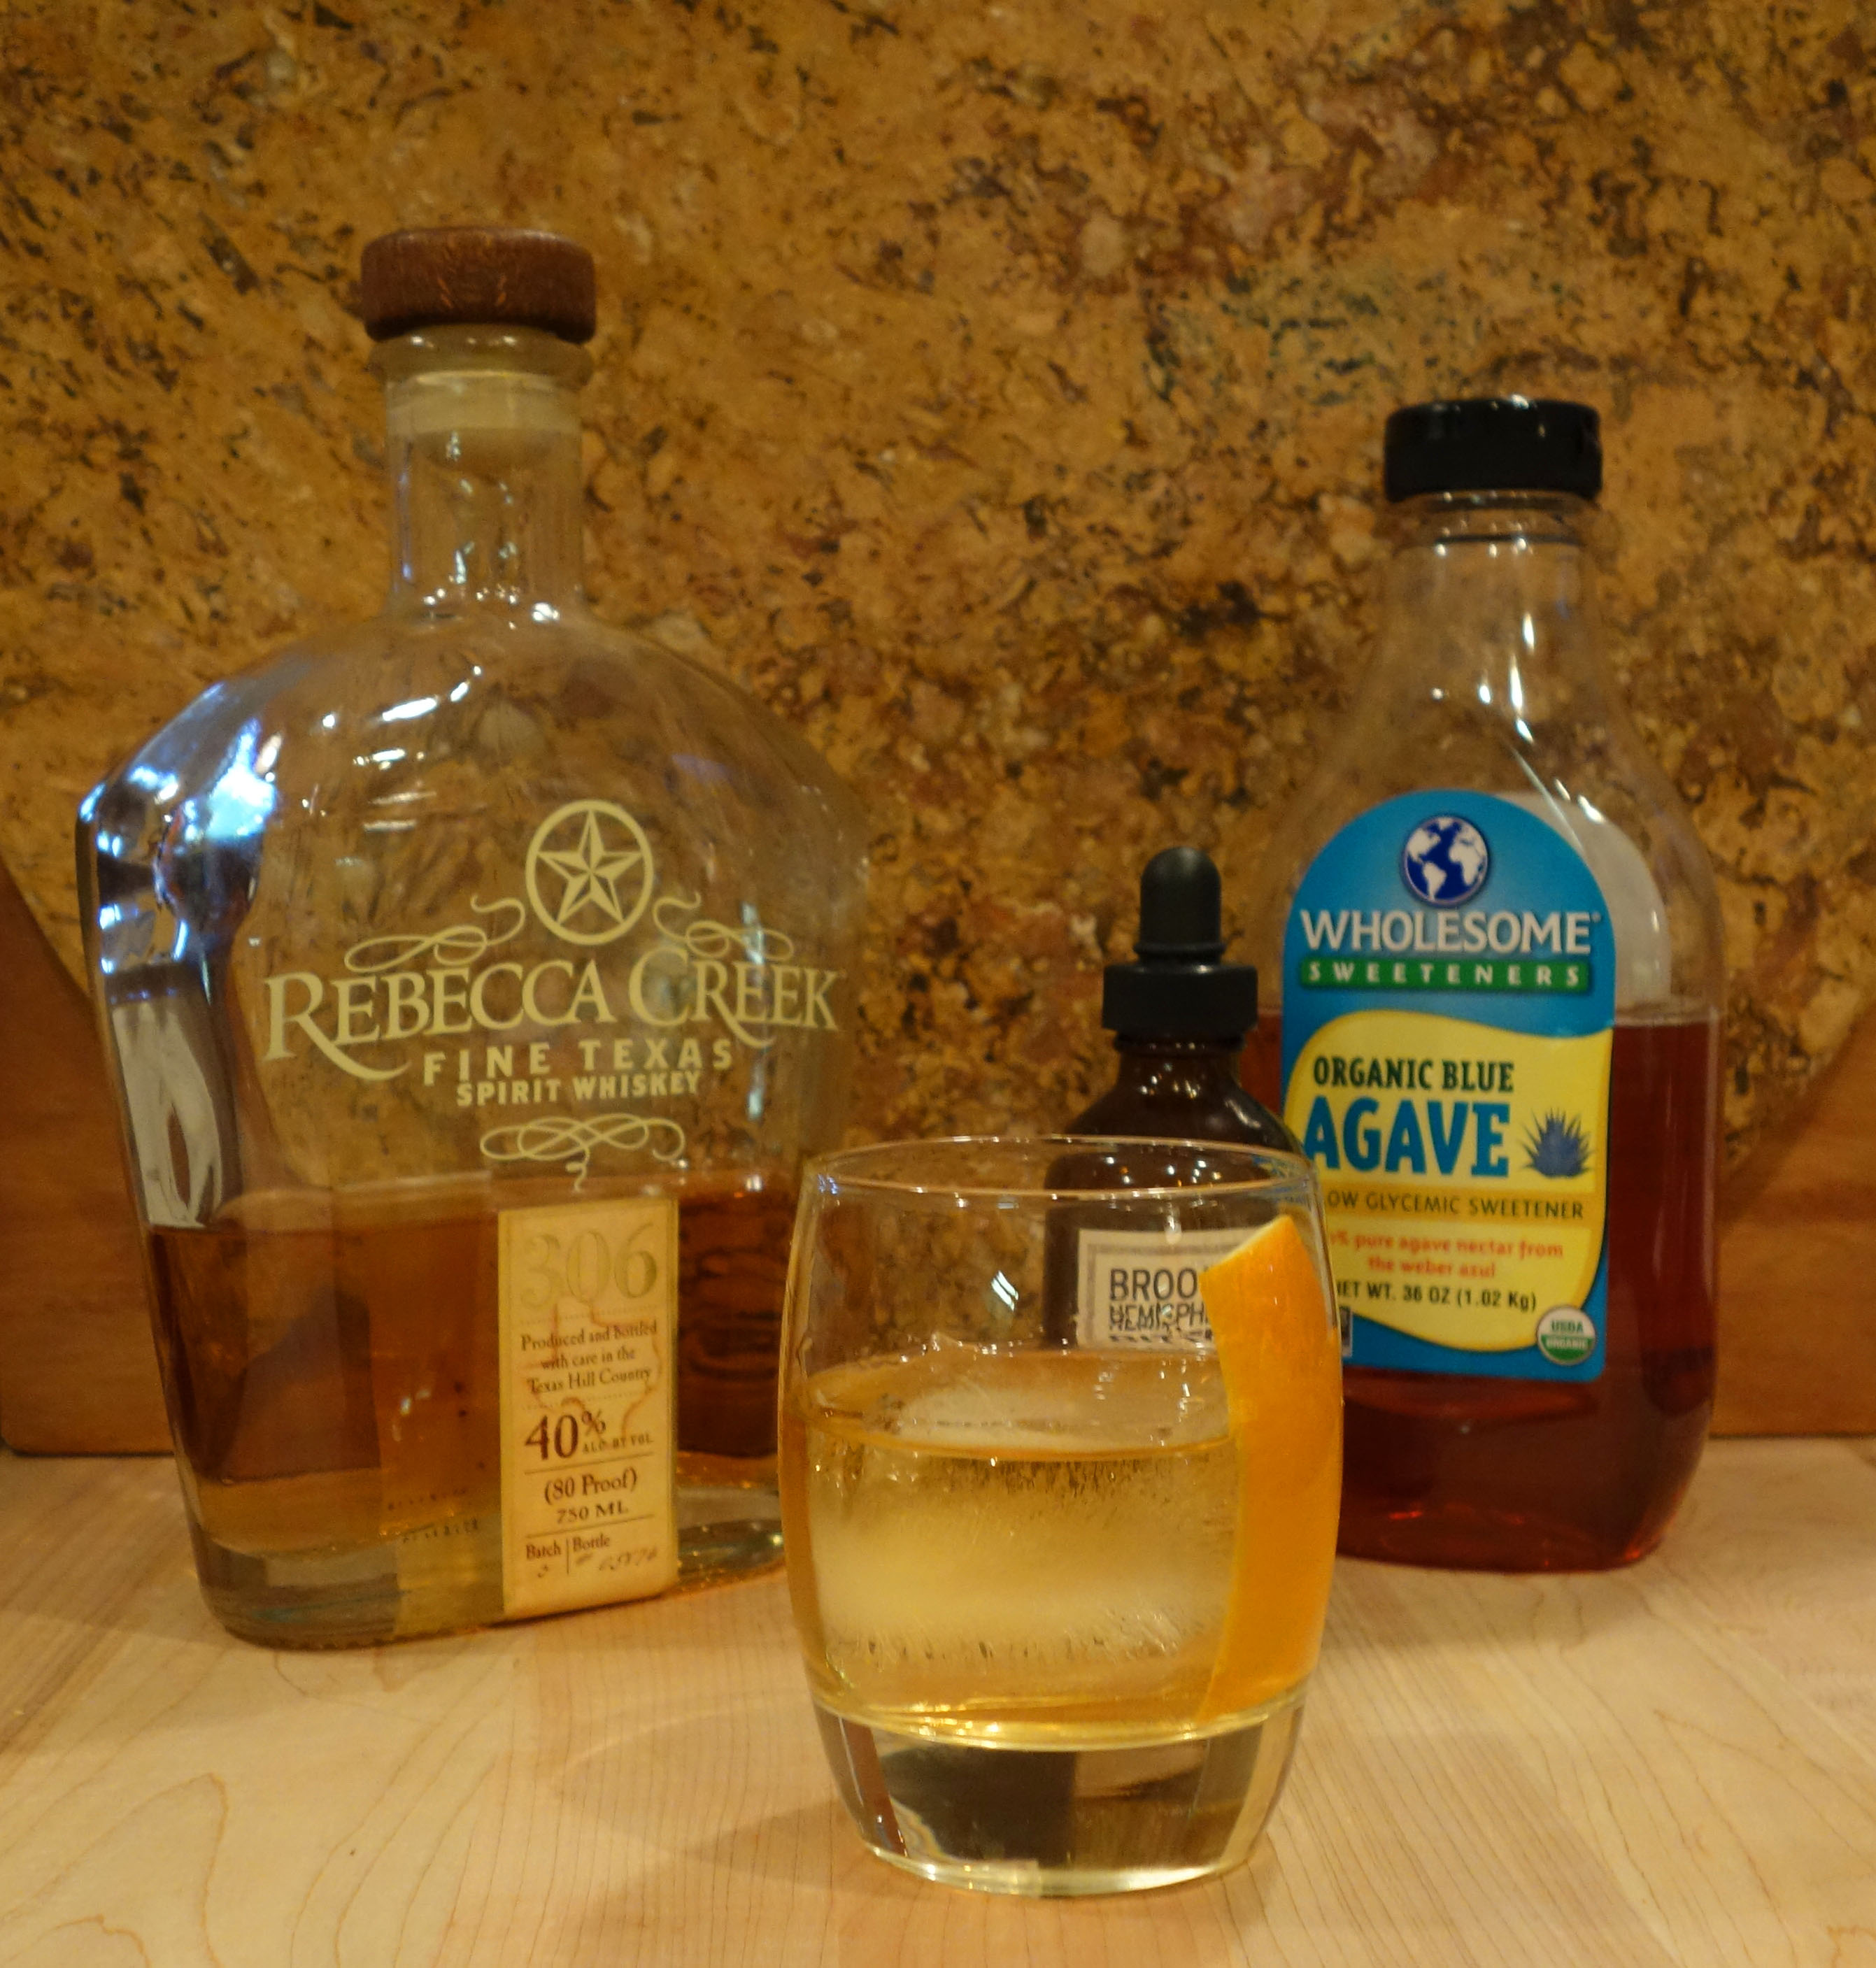
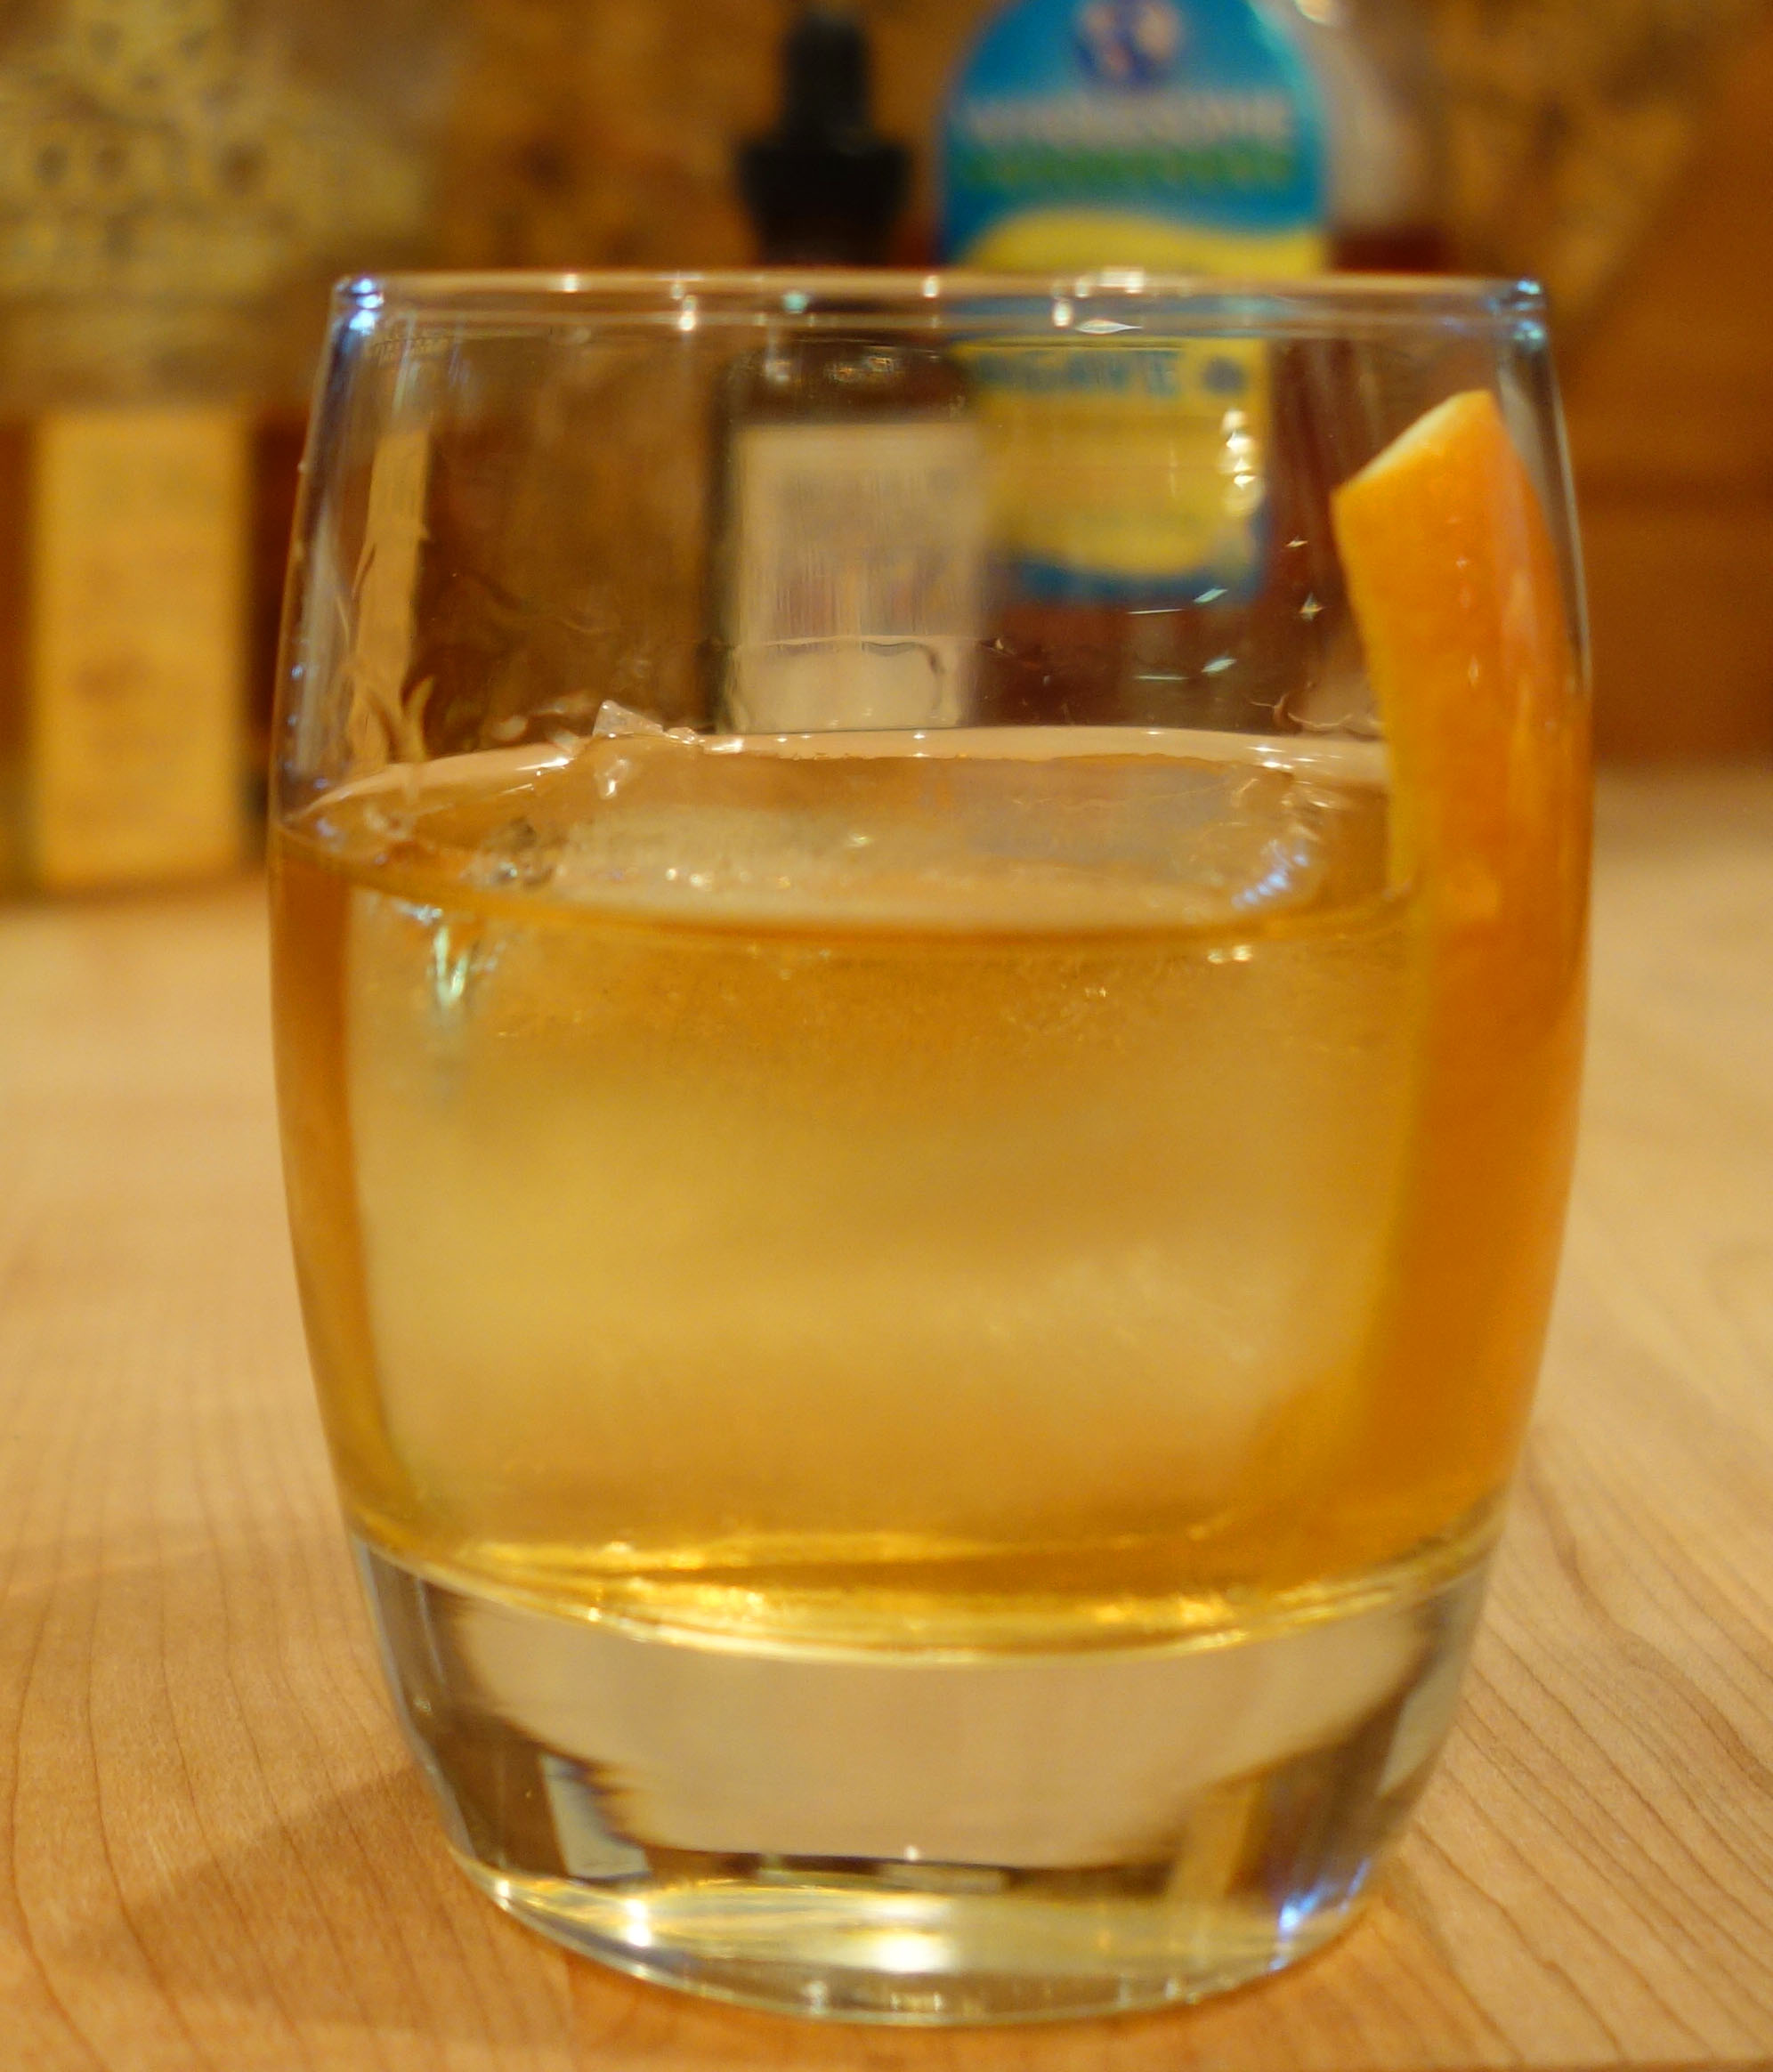
I’m Not Dead Yet (Just Married)
This is a drink we featured at our Daughter’s wedding last year. It was served at the Groom’s Whiskey and Tequila Bar, along with several other bourbon and tequila libations and hand rolled cigars.
Rebecca Creek Fine Texas Spirit Whiskey is very smooth with a little bite at the finish. The flavors are primarily barrel notes of vanilla and herbs. It is composed of young barrel aged Texas whiskey and 8 year old Kentucky Bourbon and comes off similar to a Canadian Blend. In this cocktail, these flavors back up the Black Mission Fig Bitters and the smokey agave. Made as a built drink, the initial taste is strong, but as it is sipped and swirled in your hand, the ice melts and the drink cools providing a enjoyably long, slow finish.
Here is the recipe:
1 1/2 oz. Rebecca Creek Fine Texas Spirit Whiskey
2 droppers full Brooklyn Hemispherical Black Mission Fig Bitters
1/4 oz. Agave syrup
Orange peel for garnish
Combine the first 3 ingredients in an unchilled, single Old Fashioned glass and stir
Gently add a large ice cube
Express the oil from the orange peel over the drink and float the peel.
Cheers!
MxMo Manhattan
We have two offerings for this Month’s Mixology Monday, “I’ll take Manhattan!” This one, from our fearless MxMo leader, Frederic of the CocktailVirgin blog, challenges us to revisit the classic cocktail.
Mixology Monday
Our first submission is the Manhattan 2.0 – a “Modern” version of the Manhattan with the added nuance of Sherry. For the second, we jump ahead to an article we are preparing to publish on barrel aging cocktails at home.
Manhattan 2.0
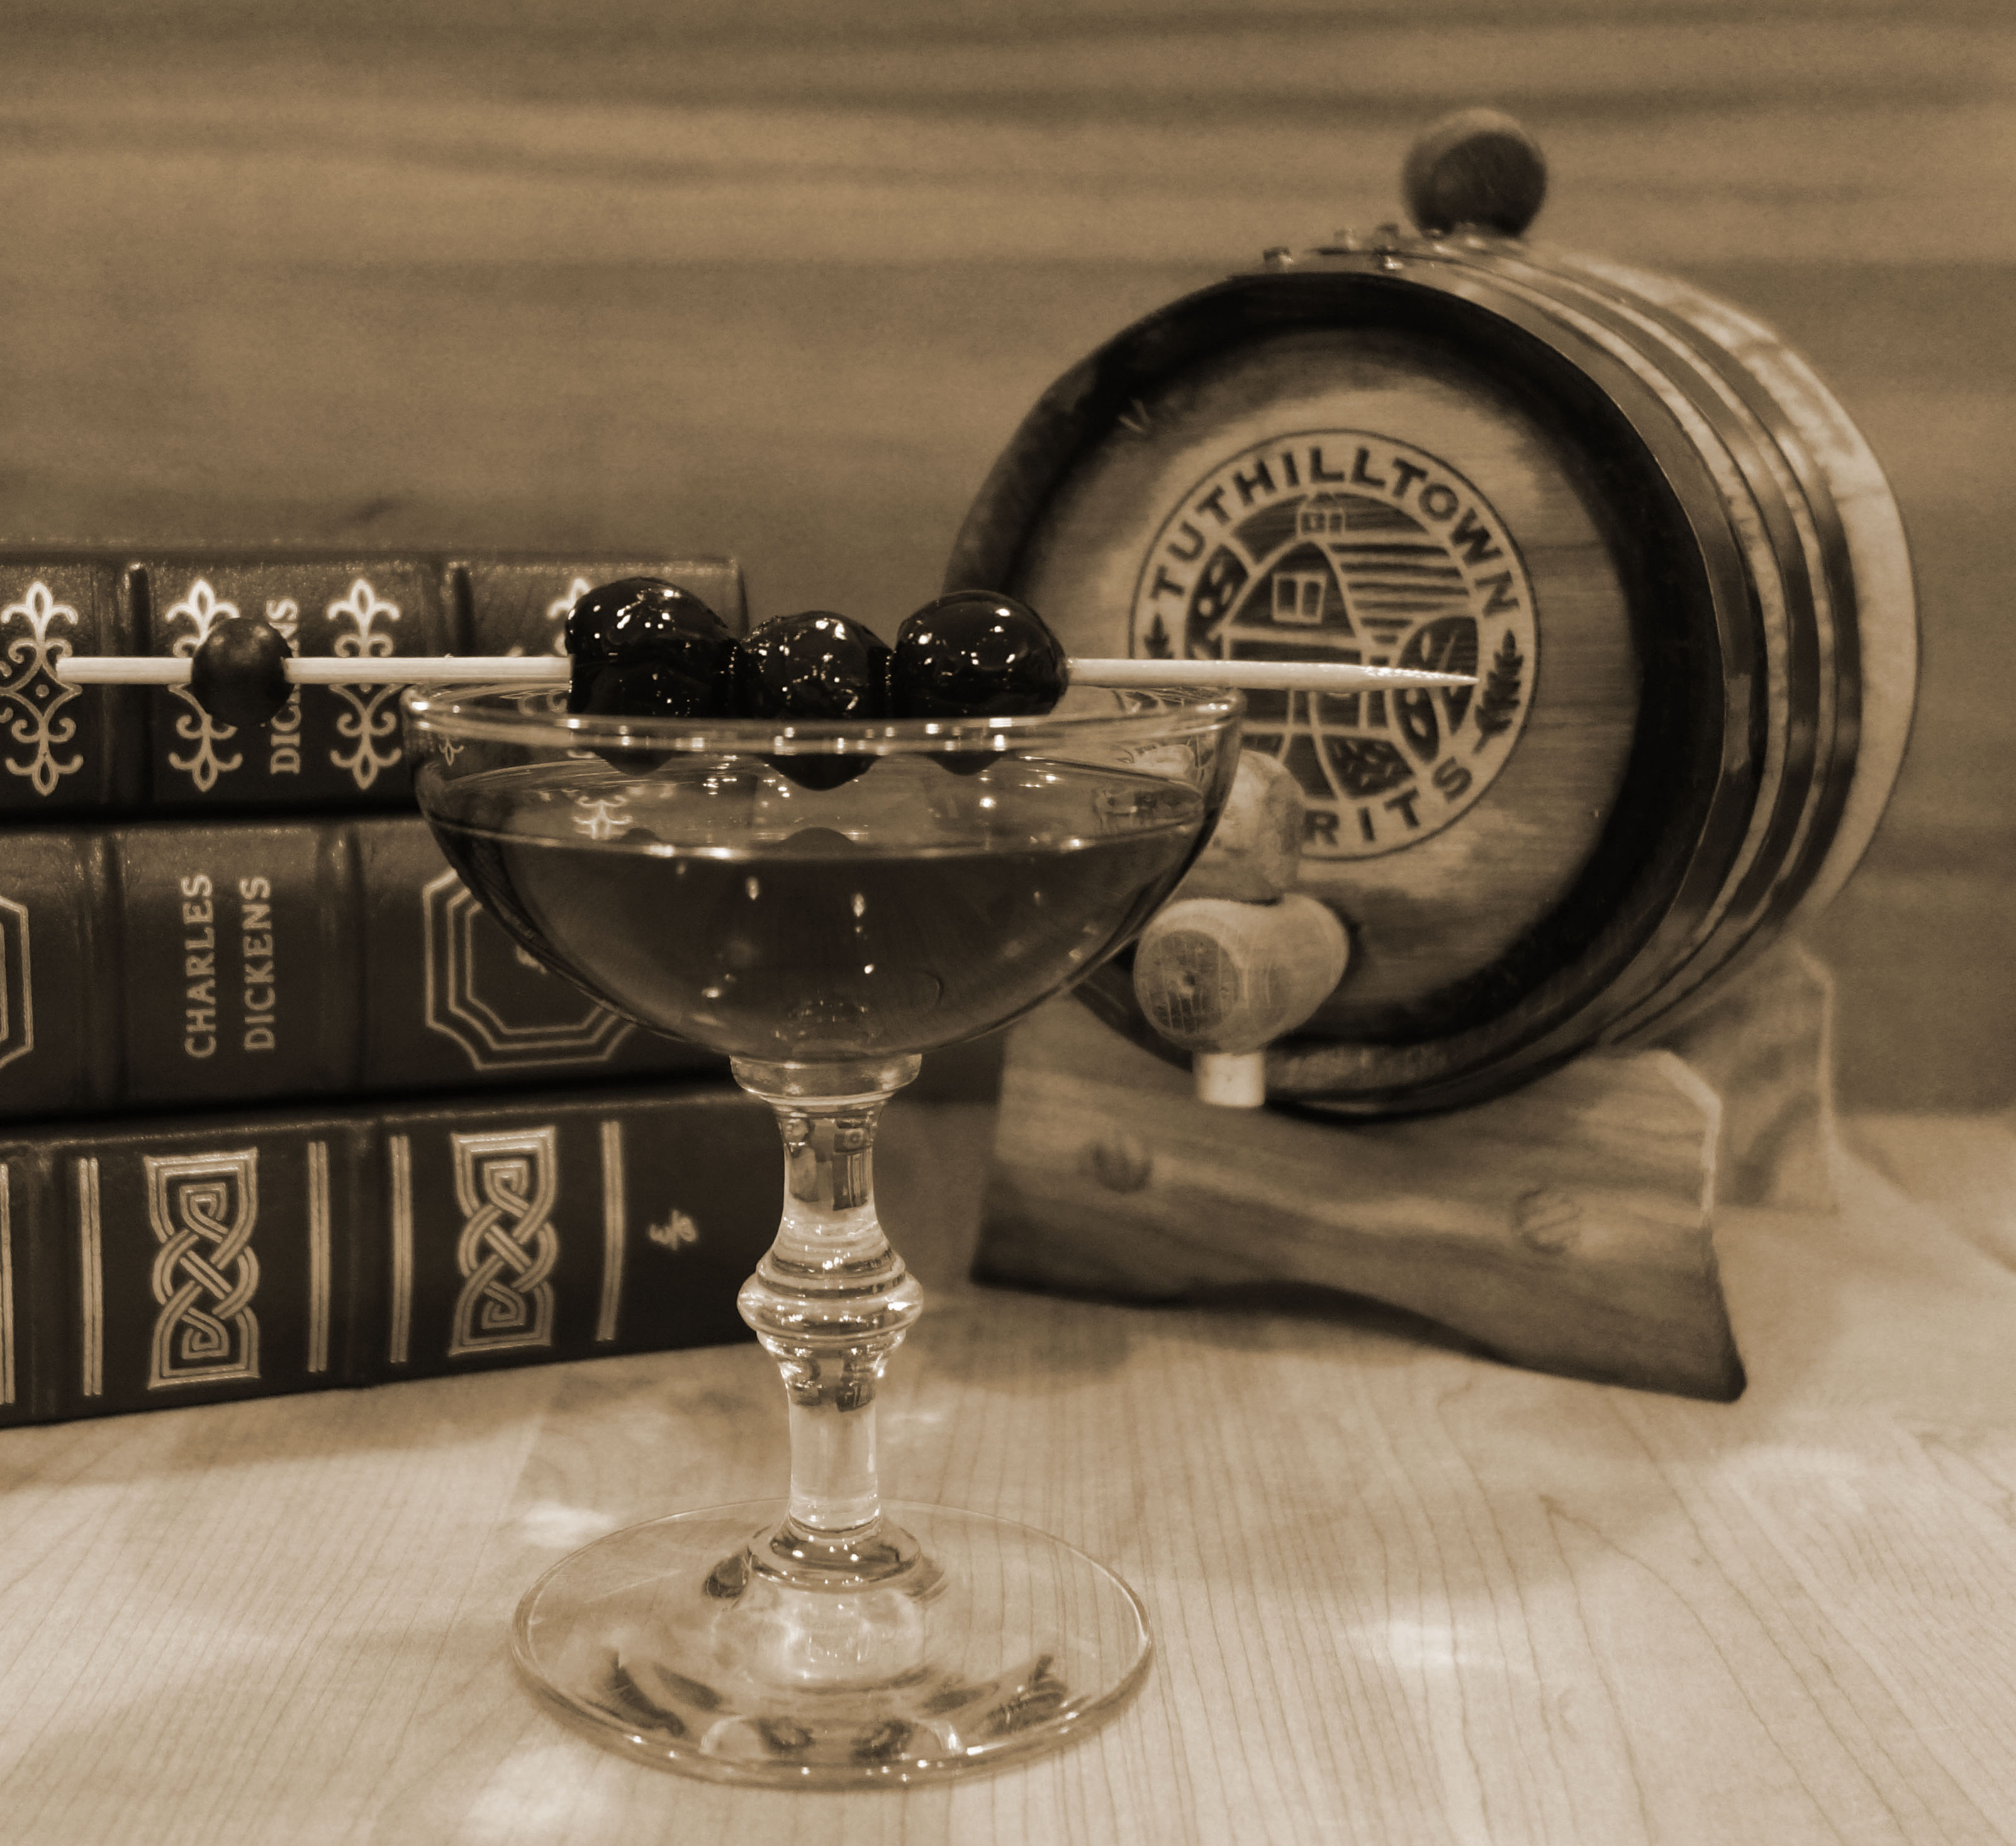
For the the bourbon in this cocktail, we tried Basil Hayden and Belle Mead. Both were excellent. The bourbon brings flavors of maple, tobacco, smoke and vanilla. This blends well with the rich, earthy Carpano Antica’s tastes of herbs, spice and slight bitterness. Tasting this without knowing the ingredients, one could easily miss the sherry. It intermingles with the Italian Vermouth, smoothing the bitterness and adding to the richness. Here is the recipe:
1 1/2 oz. Bourbon
3/4 oz. Carpano Antica
1/4 oz. Sherry
1/8 tsp. Grand Marnier
1 dash Angostura Orange Bitters
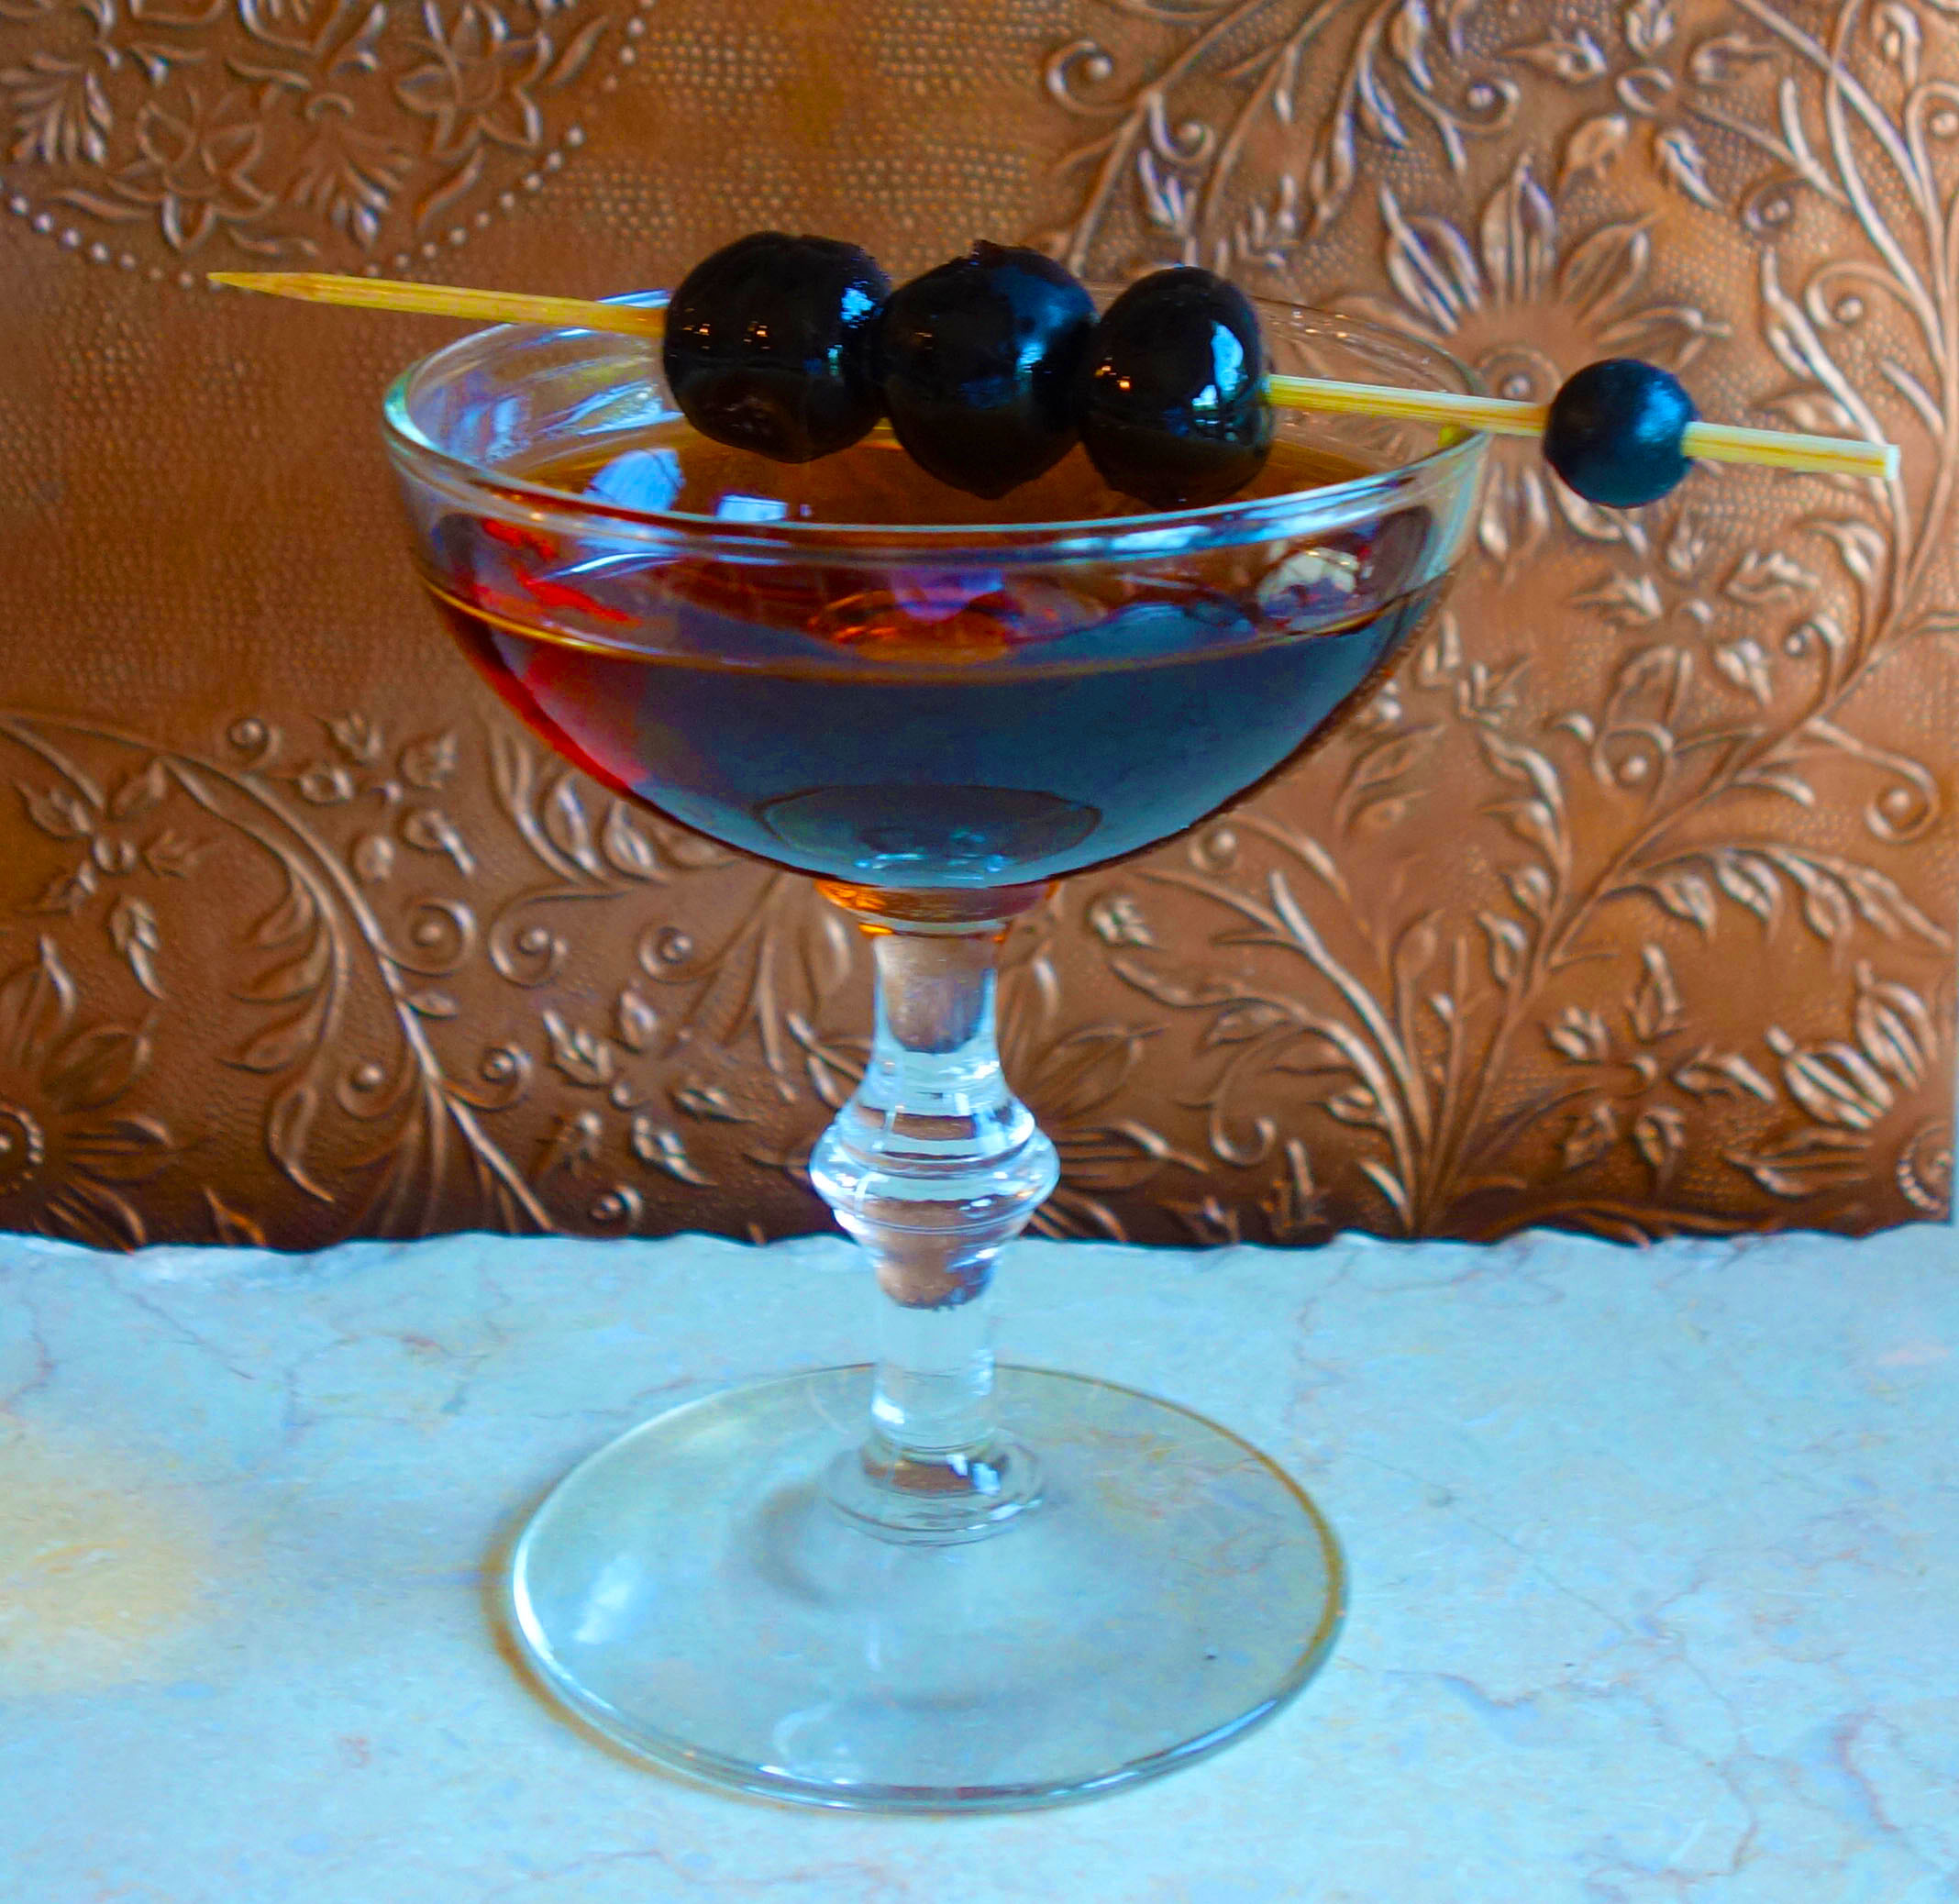
Garnish: Luxardo Maraschino Cherries and an orange peel
Chill a cocktail glass with ice and water
Add the ingredients, except the garnish, to a mixing glass with ice and stir to chill
Strain into the chilled cocktail glass
Add the cherries, (or place them on a pick), and express the orange peel over the drink and discard.
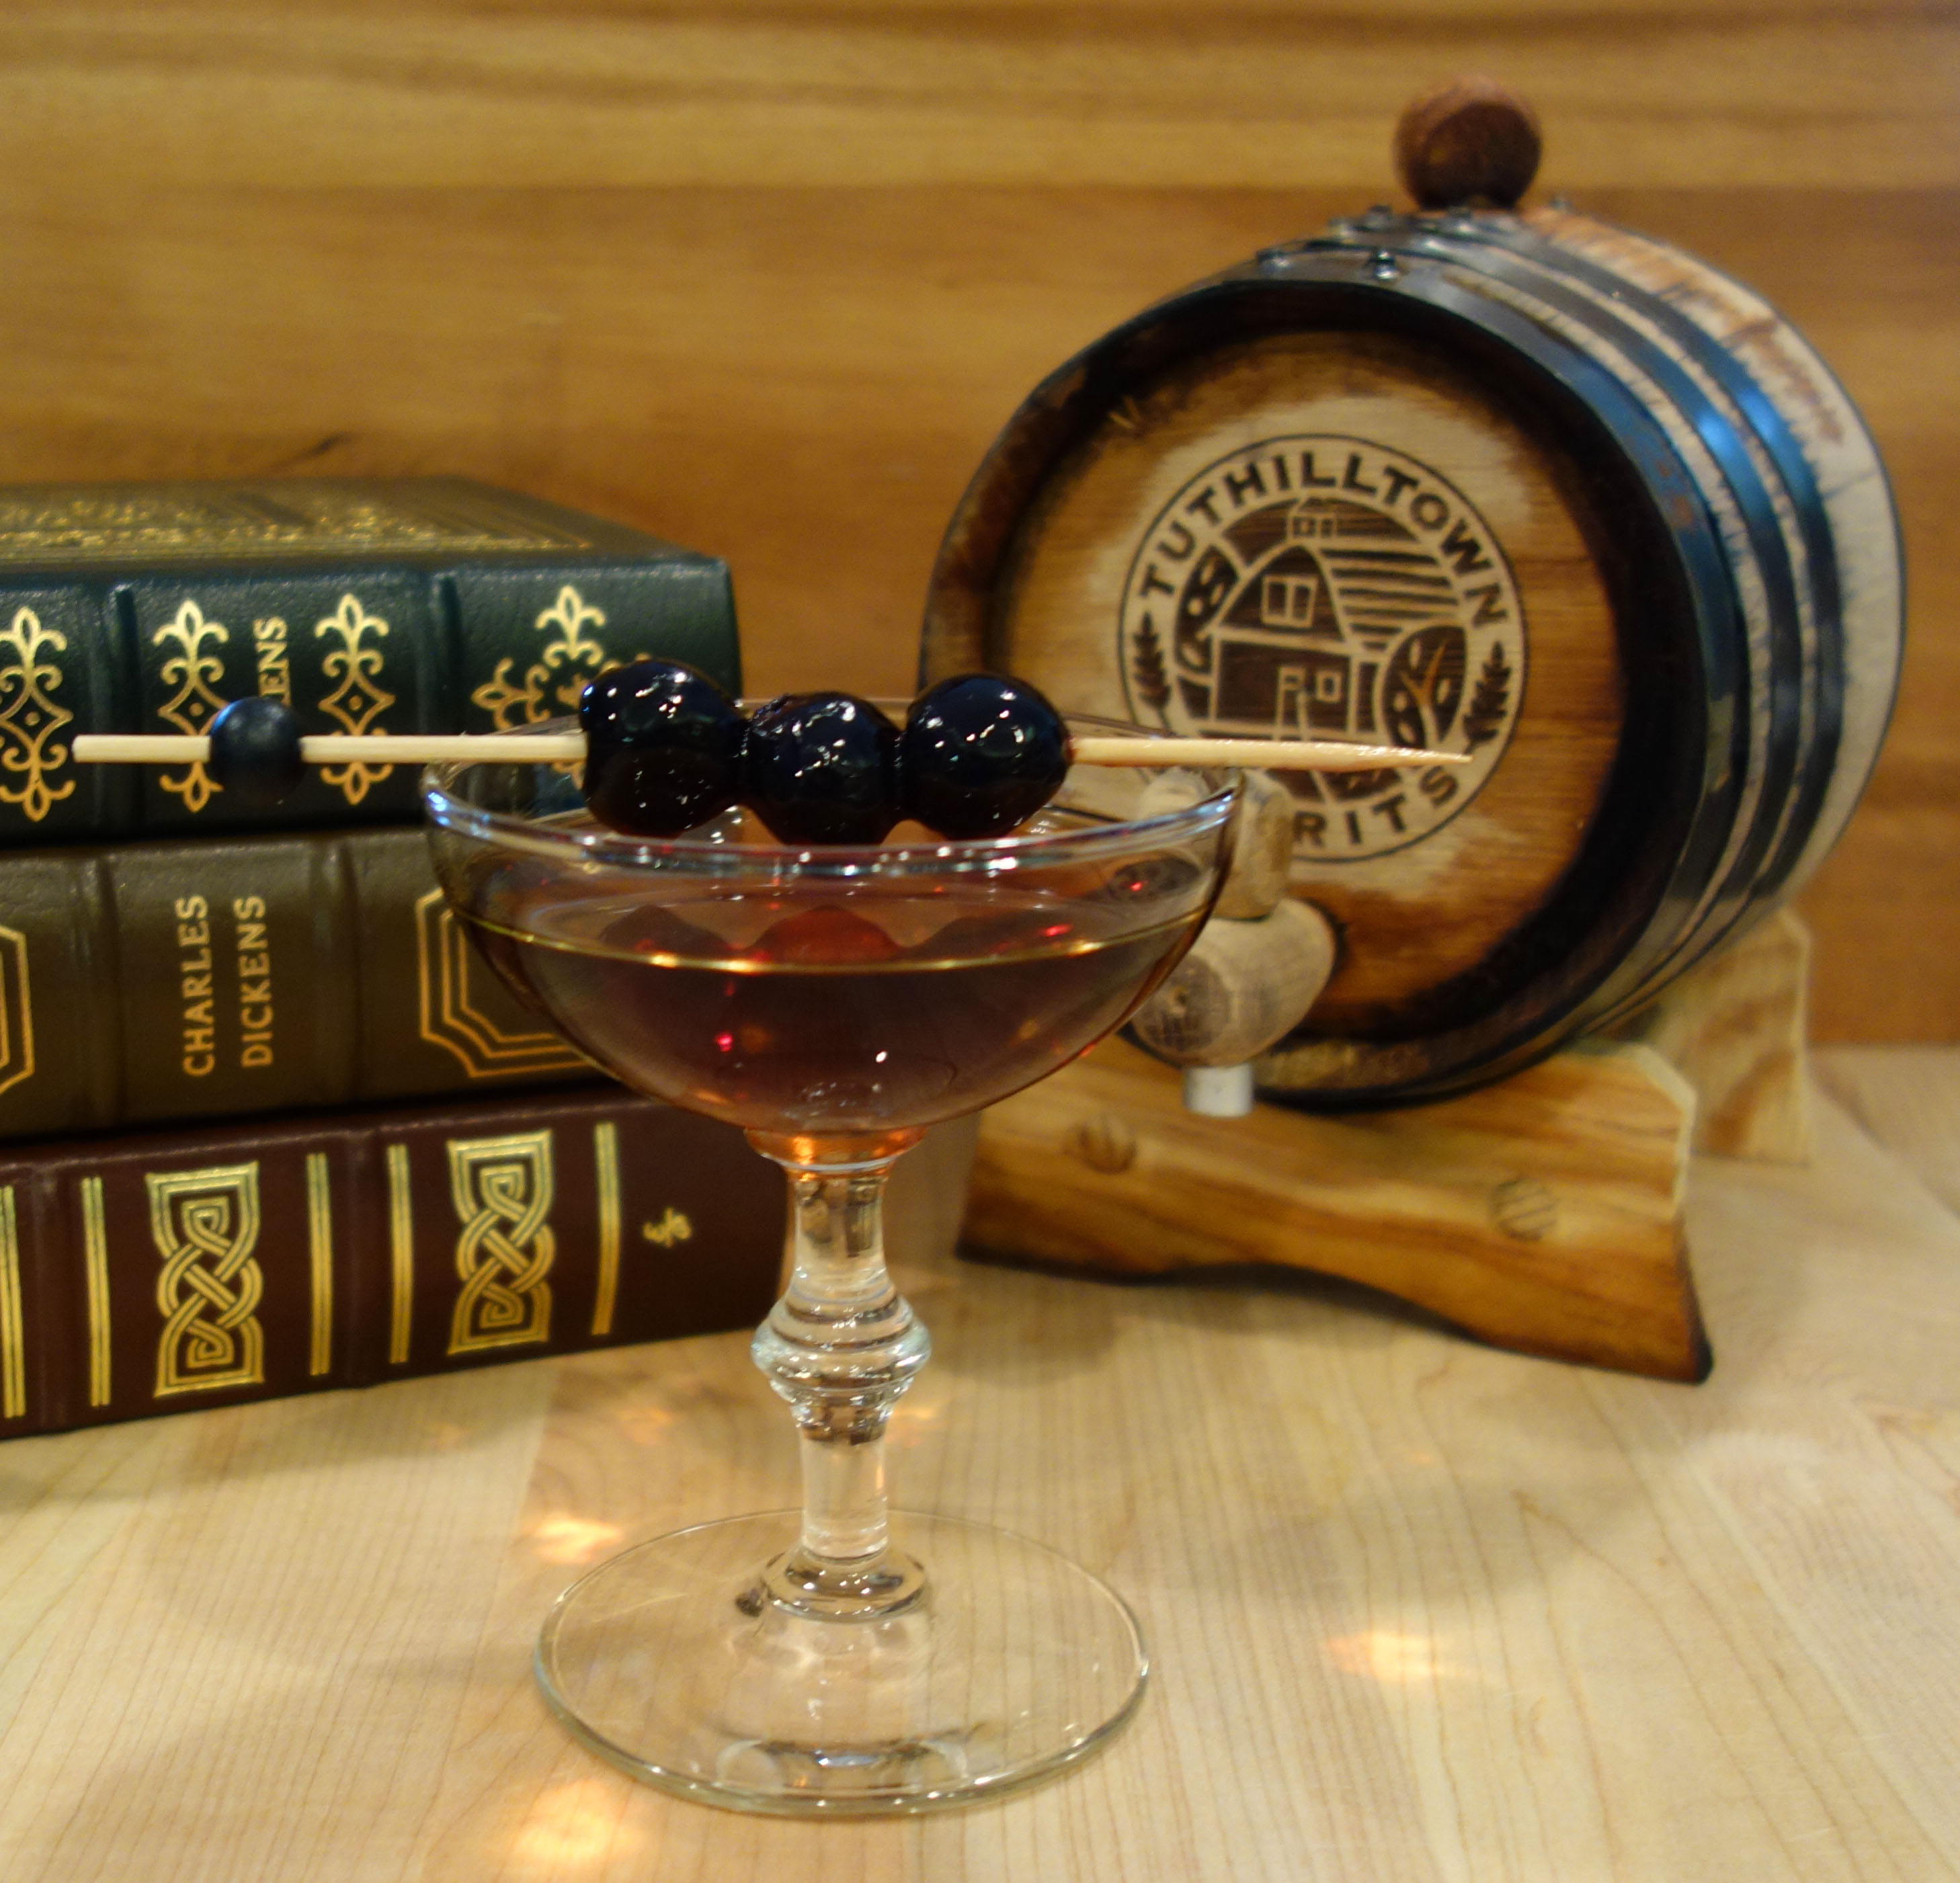
Sherry Cask Aged Manhattan
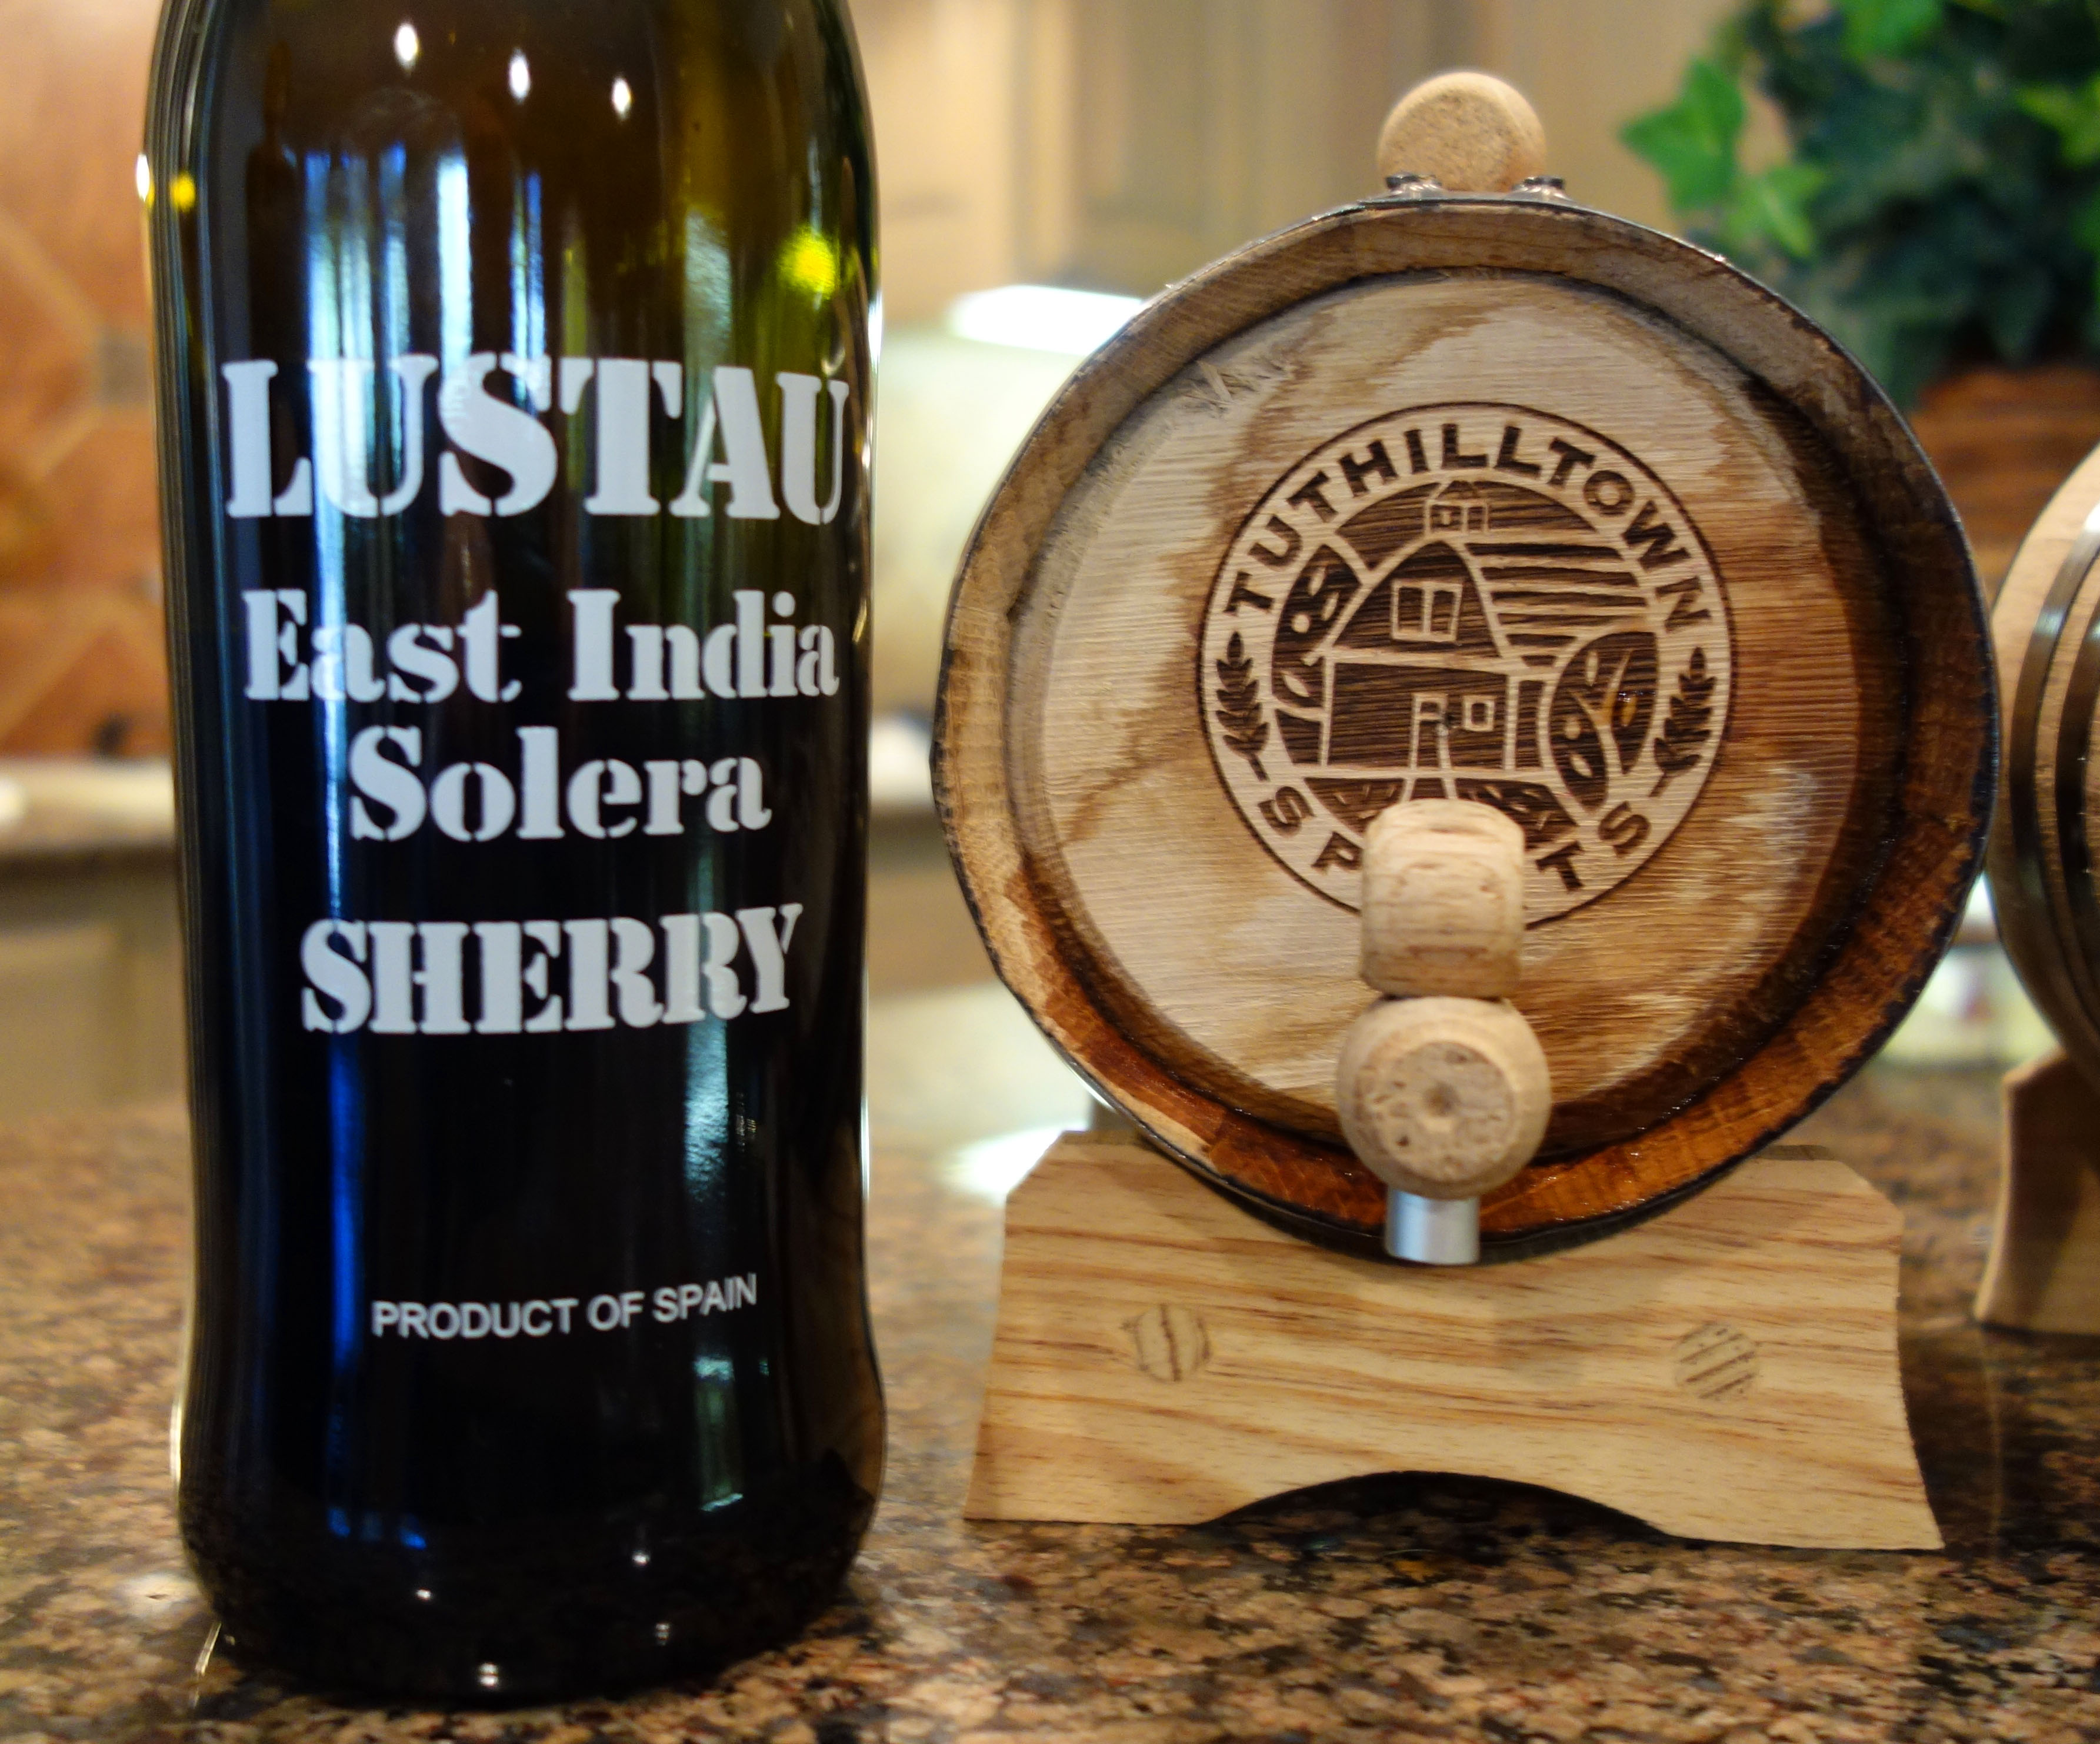
This cocktail comes from our look into barrel aging cocktails at home, which we will publish soon. We started with a new charred white oak, 1 liter cask, which was then seasoned by aging Lustau East India Solera Sherry for 4 weeks. As an aside, the Sherry came out very nice and is great in the Manhattan 2.0! The barrel was then used to age the cocktail. The small cask allows a larger surface to liquid ratio than will a bigger barrel. The larger the barrel, the longer will be the aging time.
Barrel aging a Manhattan is awesome! The charred oak adds an expected slight oakiness and smoke flavor while the Sherry brings the slightest touch of sweetness. The overall effect is a richness and depth of flavors that are melded together in a way that you’re not going to achieve any other way.
Here is the recipe for a 1 liter barrel:
For the Barrel:
1 new, 1 liter charred oak barrel with stand which has been filled with water for 24 hours
1 bottle Lustau East India Solera Sherry
Drain and rinse the barrel
Secure the tap
Fill the barrel with the Sherry and seal the bung.
Place the barrel on its stand and set aside on a water proof shallow container, such as a plastic container lid
Turn the barrel 1/4 turn each week
After 4 weeks, drain the sherry through a fine mesh strainer and store, refrigerated, in its original bottle.
Rinse the barrel and refill immediately with a cocktail – do not allow the barrel to dry out.
For the Manhattan:
20 oz. Bourbon
10 oz. Carpano Antica Italian Vermouth
1 3/4 tsp Grand Marnier
1 3/4 tsp Regans Orange Bitters
Rinse the sherry aged barrel with water
Combine all ingredients in a 1 qt. pitcher
Carefully pour ingredients into the cask
Set the cocktail filled cask on a plastic lid or other flat, liquid proof surface (the barrel will leak).
Turn the barrel 1/4 turn each week
Taste the cocktail at least weekly until you think it’s ready – about 4 weeks
When the cocktail is ready, carefully pour it from the barrel through a fine mesh strainer into a 1 quart pitcher.
Decant into a seal-able glass bottle
Store your cocktail at room temperature.
To serve:
Chill a cocktail glass with ice and water
Pour 2 1/4 oz. Sherry Cask Aged Manhattan into a mixing glass with ice and stir to chill
Strain into the chilled cocktail glass
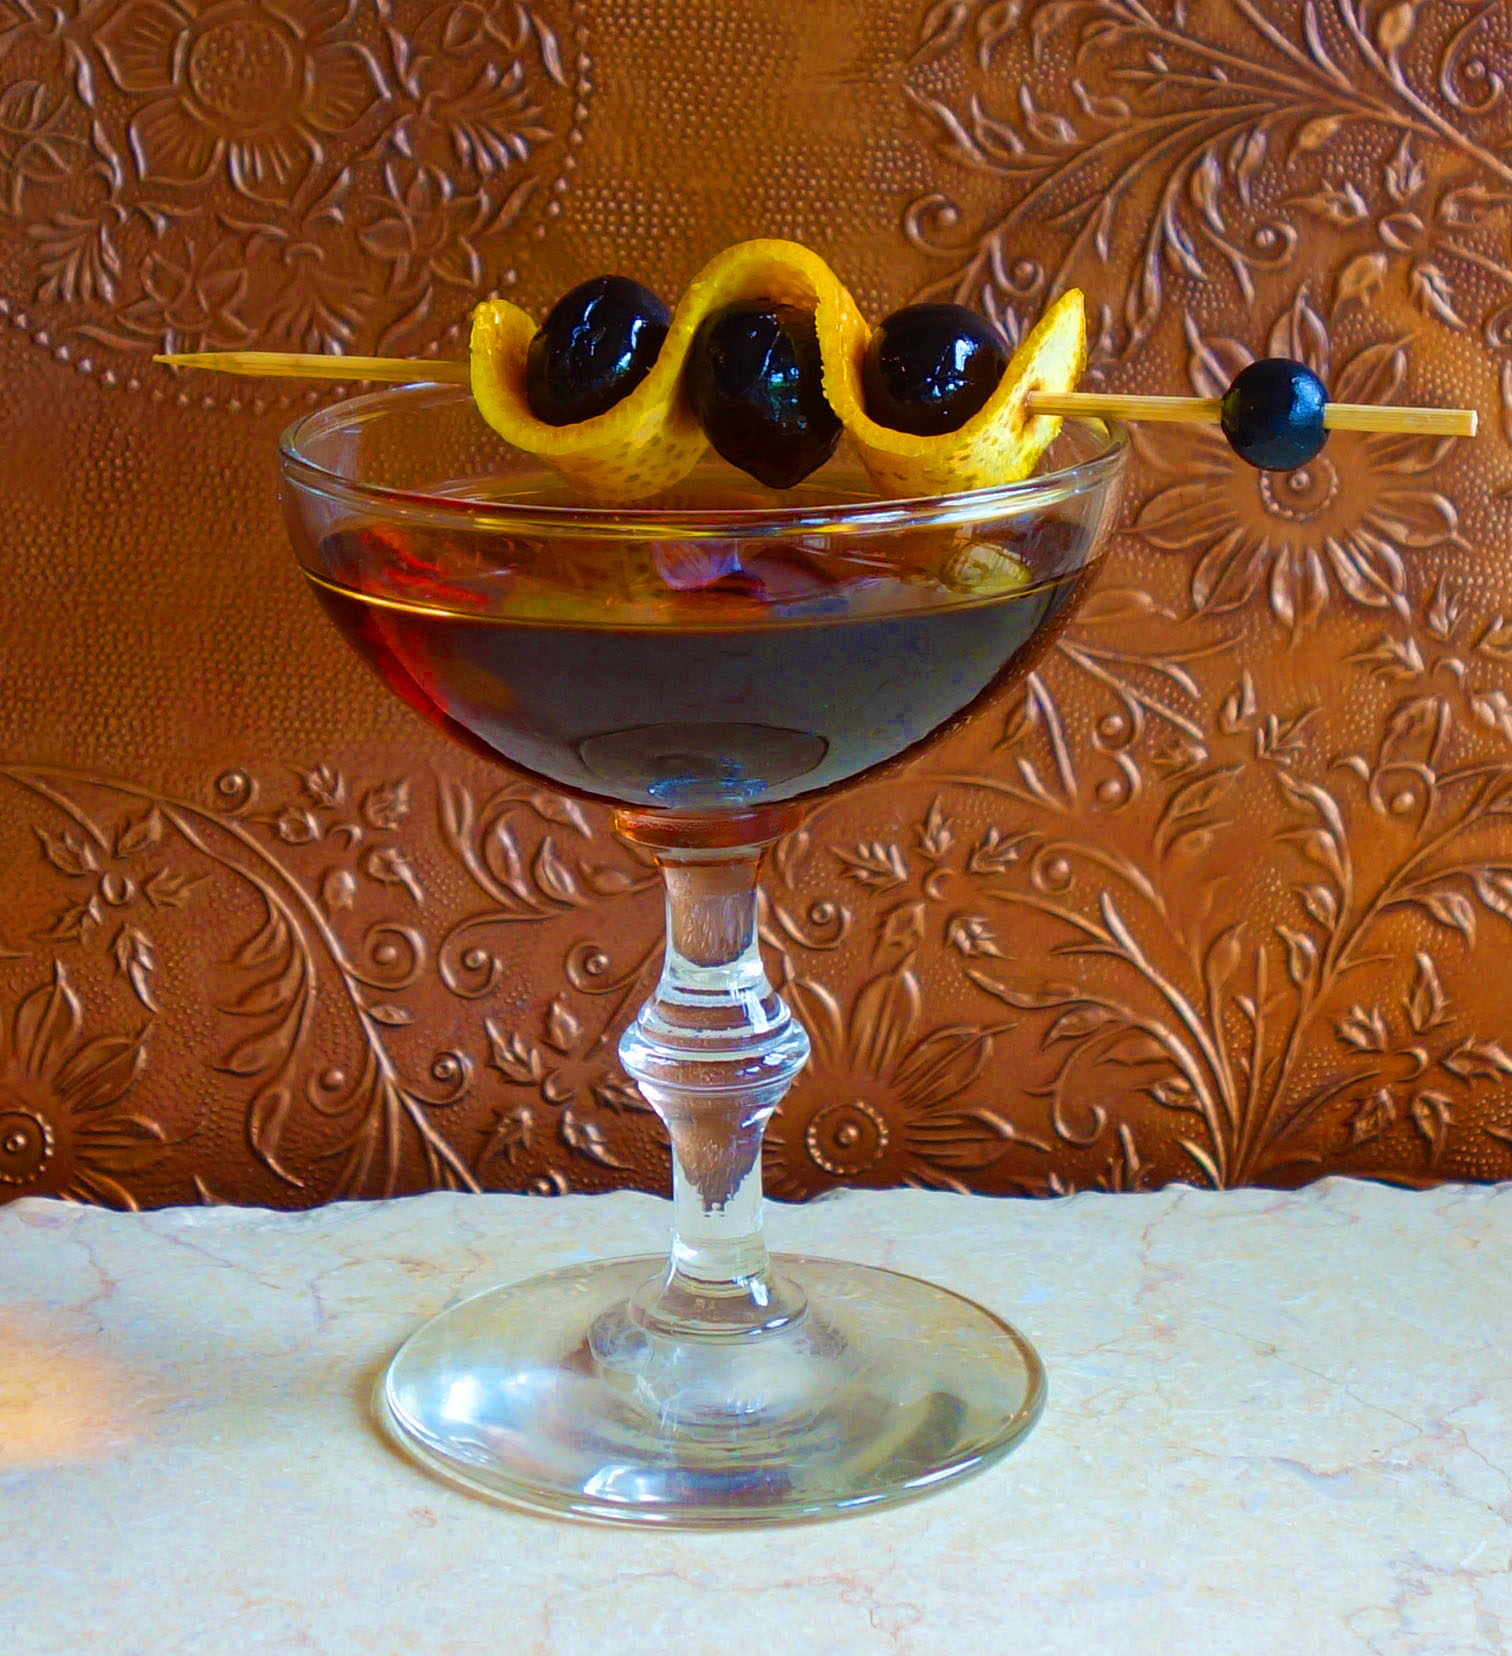
Garnish with premium maraschino cherries and an orange peel
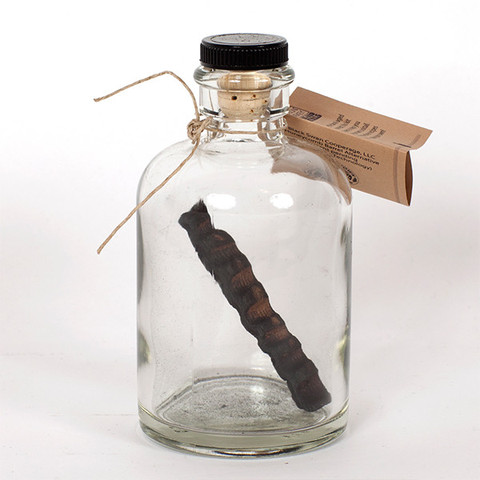
Not ready to commit to a barrel? You can approximate the same aged cocktail effect using a small bottle and a charred barrel stave, available here. It will lack the richness and depth of flavor of barrel aging, but it will be close.
The bottle holds 12 oz. The recipe is then:
7 oz. Bourbon
3 1/2 oz. Carpano Antica Italian Vermouth
1/2 tsp Grand Marnier
1/2 tsp Regans Orange Bitters
Combine the ingredients in the bottle and add the barrel stave
Swirl it everyday
It will probable be ready in 2 weeks
Cheers!
Manhattan 2.0
For the the bourbon in this cocktail, we tried Basil Hayden and Belle Mead. Both were excellent. The bourbon brings flavors of maple, tobacco, smoke and vanilla. This blends well with the rich, earthy Carpano Antica’s tastes of herbs, spice and slight bitterness. Tasting this without knowing the ingredients, one could easily miss the sherry. It intermingles with the Italian Vermouth, smoothing the bitterness and adding to the richness. Here is the recipe:
Manhattan 2.0
1 1/2 oz. Bourbon
3/4 oz. Carpano Antica
1/4 oz. Sherry
1/8 tsp. Grand Marnier
1 dash Angostura Orange Bitters
Garnish: Luxardo Maraschino Cherries and an orange peel
Chill a cocktail glass with ice and water
Add the ingredients, except the garnish, to a mixing glass with ice and stir to chill
Strain into the chilled cocktail glass
Add the cherries, (or place them on a pick), and express the orange peel over the drink and discard.
Cheers!
Paradise Remembered
Mixology Monday
It is Mixology Monday! The theme, “Drink of Shame,” is the invention of our host Tipicular Fixins. We have all quaffed a few sweet, strange libations and I have imbibed my share of questionable drinks. This Month’s challenge, (now that we are real mixologists), is to create a cocktail that elevates a drink from our misadventurous youth onto a higher plain. I thought of resurrecting Trash Can Punch like some Frankenstein concoction, but instead I have chosen the Pina Colada.
When I was young, I spent a lot of time diving. I would travel to islands and points south of Mexico known primarily for beautiful beaches, clear waters and unreliable postal service. I would order a Pina Colada at practically every bar I entered. These were occasionally amazing, but primarily consisted of some white liquid along with an unknown rum – all whirred with ice and usually sticky sweet. I don’t remember ever ordering one in the US.
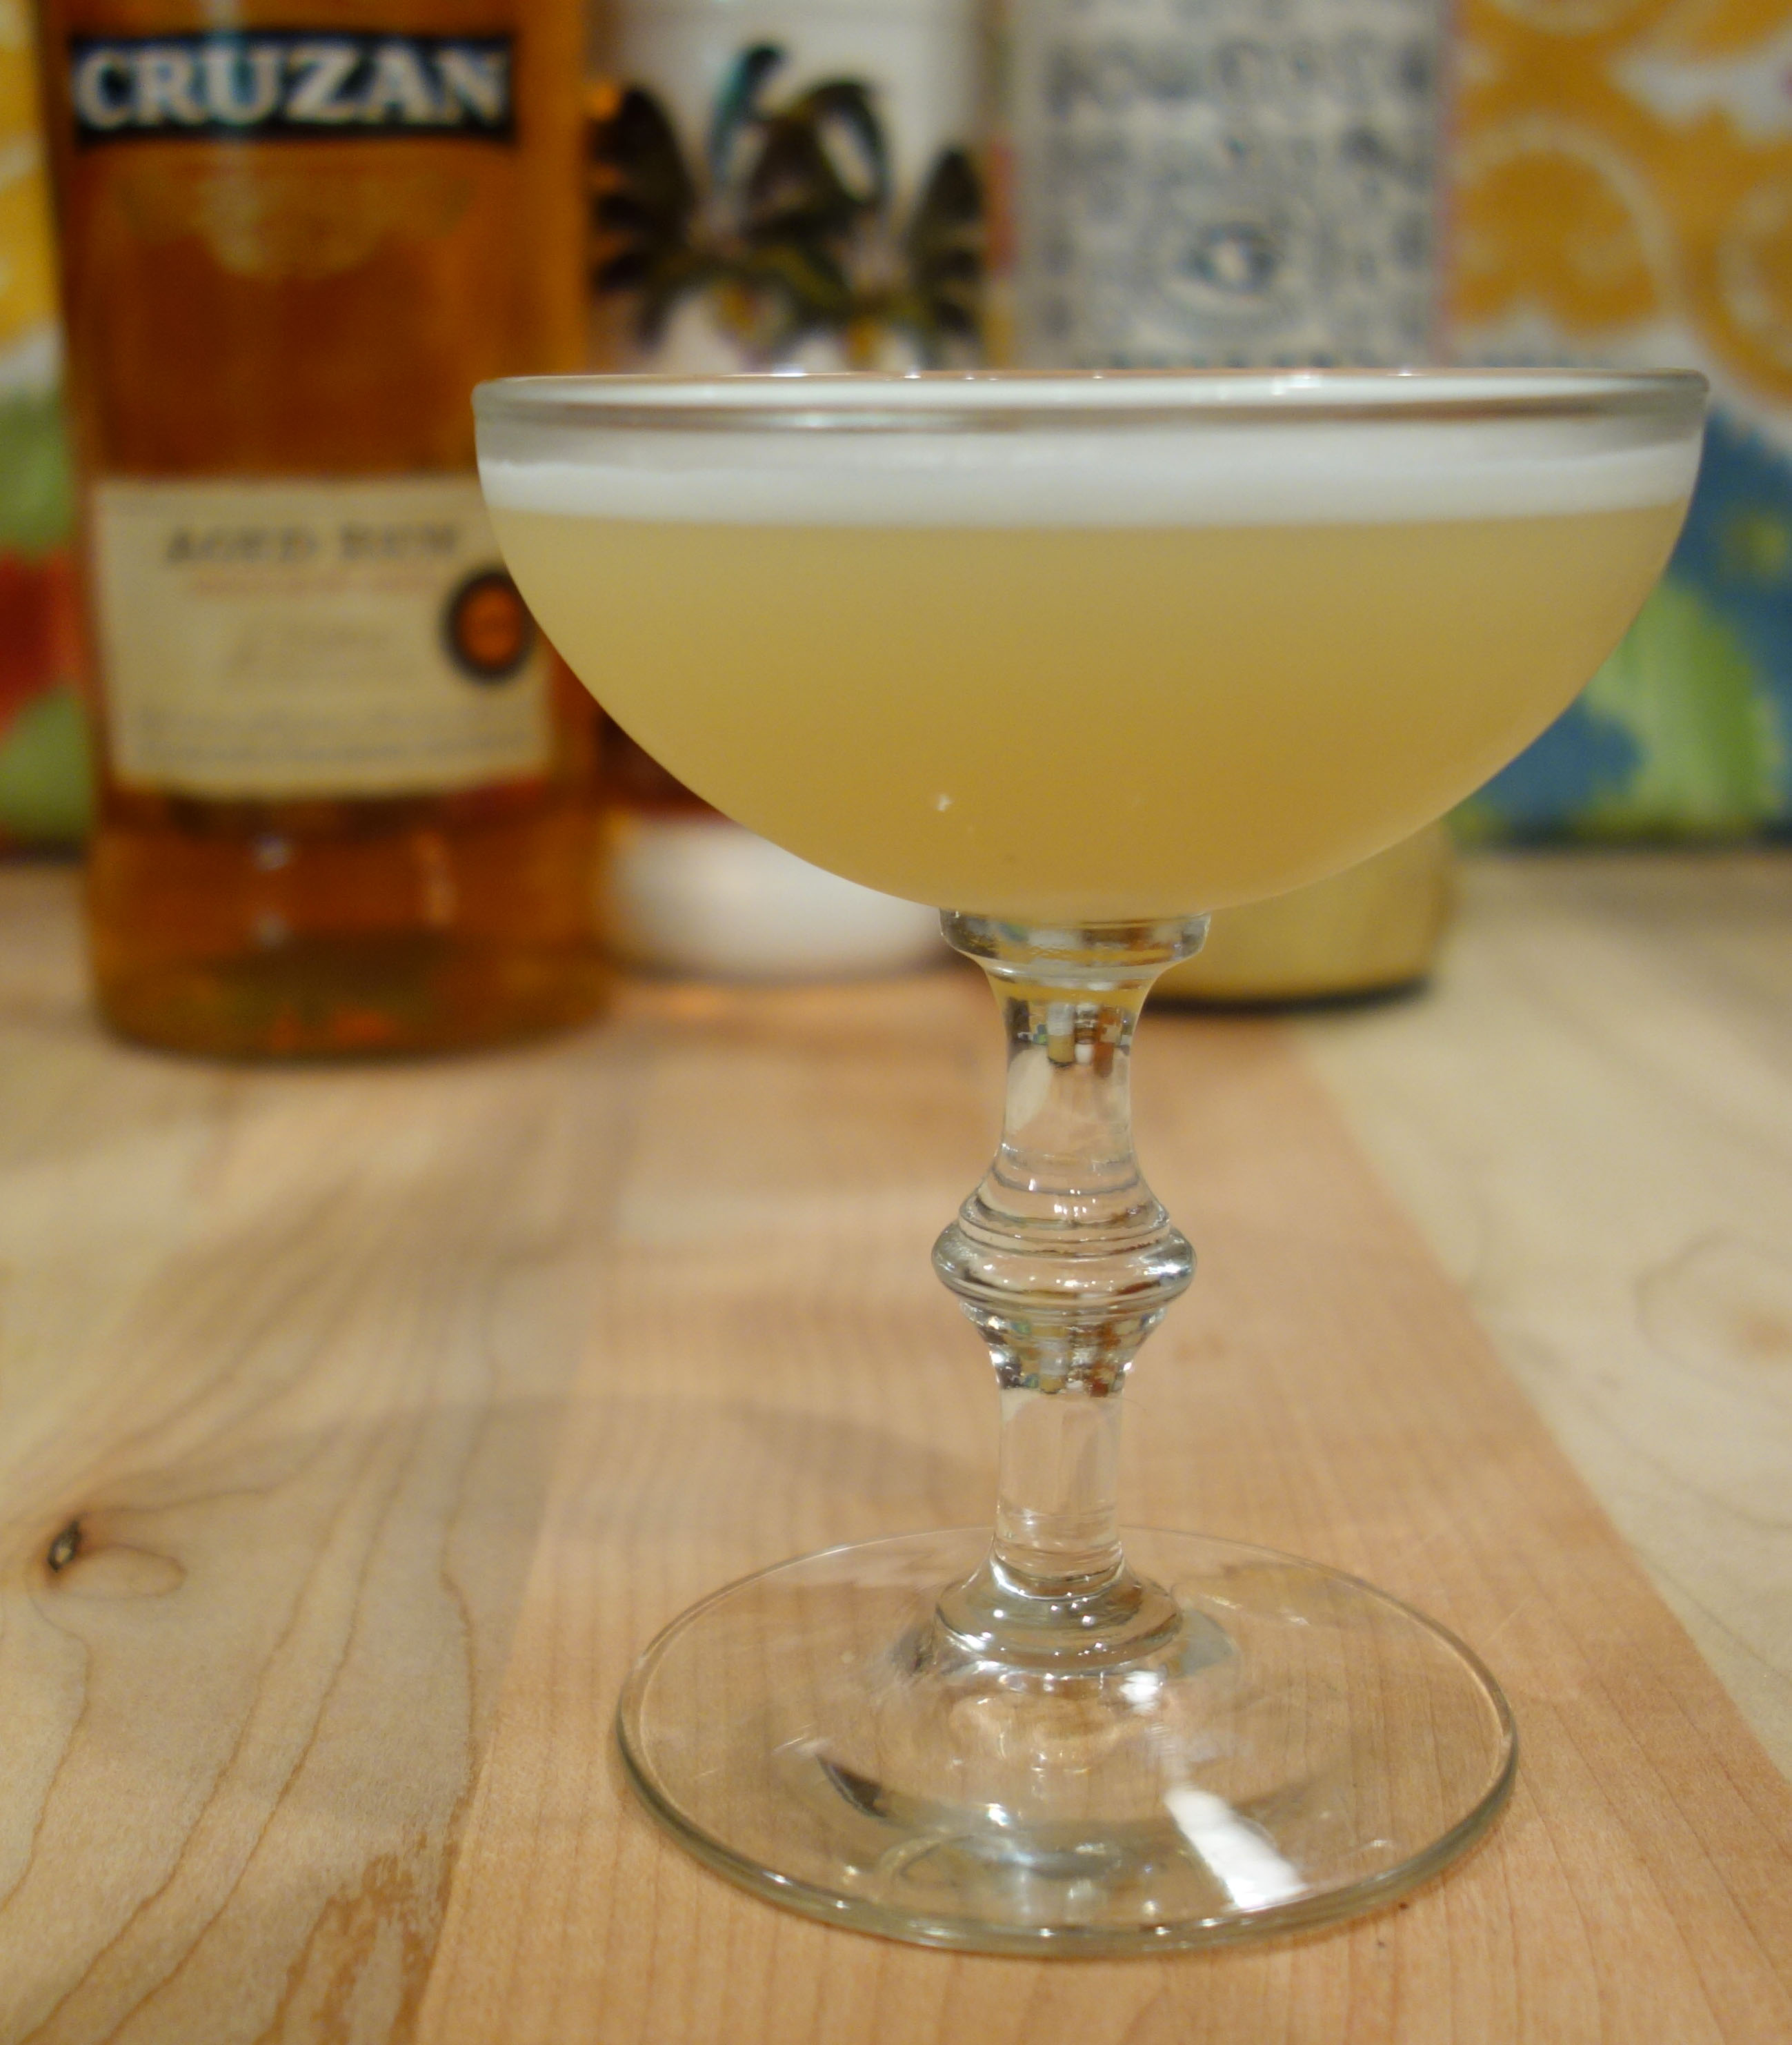
The cocktail I created, the Paradise Remembered, keeps the flavors of rum, coconut and pineapple, but I made it as a sour. I used Kalani Coconut Liqueur, Cruzan Dark Aged Rum, fresh pineapple juice and Luxardo Maraschino Liqueur. The result is much lighter than a Pina Colada. The flavors are coconut and rum with the pineapple completing the combination. The egg yolk contributes that silky mouth feel along with the appealingly luxurious, thick foam floating on top.
Paradise Remembered
1 1/2 Oz. Kalani Coconut Liqueur
3/4 Oz. Cruzan Dark Aged Rum
1 oz. Fresh Pineapple Juice
1/2 Oz. Luxardo Maraschino Liqueur
1 egg yolk
Chill a cocktail glass with ice and water
Combine all ingredients in a shaker and shake without ice for 30 seconds

 The theme for this month’s